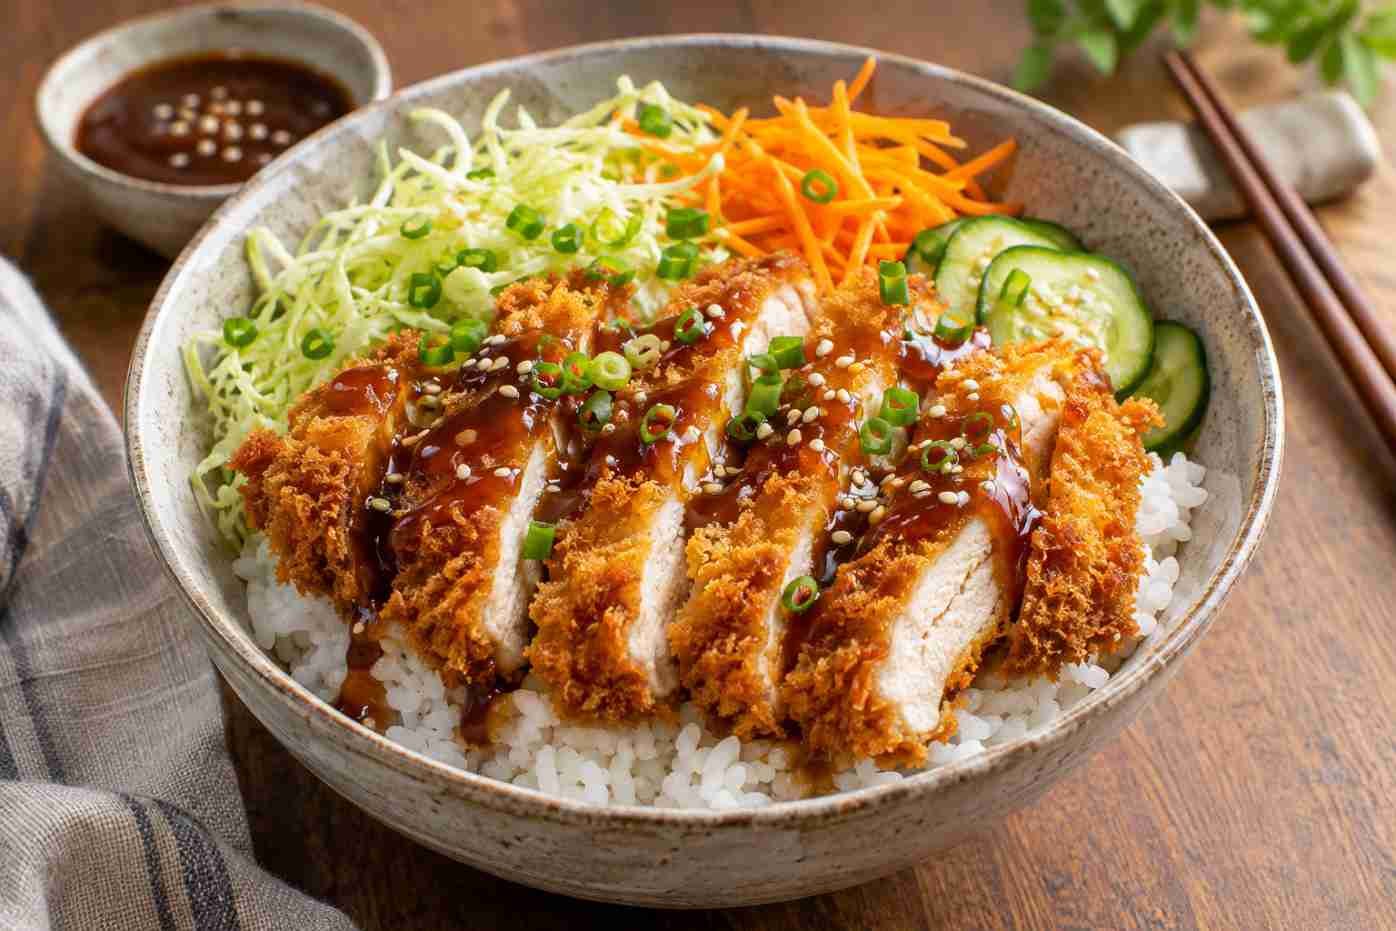
A good chicken katsu bowl is all about contrast. You want chicken with a crisp, golden coating, warm rice underneath, a sauce that brings everything together, and something fresh and crunchy to balance each bite. It is the kind of dinner that feels like something you would order at a Japanese restaurant, but it is surprisingly manageable to make at home.
This Chicken Katsu Bowl Recipe combines panko-crusted chicken, fluffy rice, shredded cabbage, quick-pickled cucumber, and a homemade sweet and tangy katsu sauce. You can pan-fry the chicken for a traditional crispy finish or use an air fryer when you want to cook with less oil. Either way, the result is a satisfying meal that works just as well for a weekend dinner as it does for a planned weekday lunch.
What Is a Chicken Katsu Bowl?
Chicken katsu is a Japanese-style breaded chicken cutlet. The chicken is coated in flour, dipped in beaten egg, covered with panko breadcrumbs, and cooked until the outside becomes golden and crisp. Unlike ordinary breadcrumbs, panko has a light, flaky texture that produces a particularly crunchy coating.
When served as a bowl, sliced chicken katsu sits over cooked rice alongside vegetables and sauce. Traditional chicken katsu is commonly served with shredded cabbage and tonkatsu-style sauce. This version turns those familiar flavors into a complete rice bowl with a few additional toppings.
Chicken Katsu Bowl Recipe Overview
| Recipe Details | Information |
|---|---|
| Preparation Time | 20 minutes |
| Cooking Time | 25 minutes |
| Total Time | 45 minutes |
| Servings | 4 bowls |
| Cuisine | Japanese-inspired |
| Difficulty | Easy to Moderate |
| Cooking Methods | Pan-Fried or Air-Fried |
Ingredients for Chicken Katsu Bowl
This recipe uses ingredients that are easy to find in most supermarkets. Panko breadcrumbs are worth seeking out because they make a noticeable difference to the texture of the chicken.
For the Crispy Chicken Katsu
- 2 large boneless, skinless chicken breasts (about 600 g total)
- 1/2 cup all-purpose flour
- 2 large eggs
- 1 1/2 cups panko breadcrumbs
- 1 teaspoon salt
- 1/2 teaspoon freshly ground black pepper
- 1/2 teaspoon garlic powder
- 1/2 teaspoon paprika (optional)
- Vegetable or canola oil for shallow frying, or oil spray for air frying
For the Homemade Katsu Sauce
- 3 tablespoons ketchup
- 2 tablespoons Worcestershire sauce
- 1 tablespoon soy sauce
- 2 teaspoons honey or brown sugar
- 1 teaspoon rice vinegar
- 1/2 teaspoon grated fresh ginger
- 1 teaspoon water, if needed to thin the sauce
For the Rice and Vegetables
- 3 cups cooked jasmine rice or Japanese short-grain rice
- 2 cups finely shredded green cabbage
- 1 medium cucumber, thinly sliced
- 1 medium carrot, grated or cut into thin strips
- 2 tablespoons rice vinegar
- 1 teaspoon sugar
- 1/4 teaspoon salt
- 2 green onions, finely chopped
- 1 teaspoon toasted sesame seeds
Also Read: Chicken Katsu Curry
How to Make Chicken Katsu Bowl
The easiest way to prepare this meal is to get the rice, vegetables, and sauce ready before cooking the chicken. That way, you can serve the cutlets while the coating is still crisp.
Step 1: Prepare the Rice
Rinse uncooked rice under cool running water until the water becomes mostly clear. Cook according to the package instructions or use a rice cooker. The ingredient list calls for 3 cups of cooked rice, which is approximately 1 cup of uncooked rice, depending on the variety.
Once cooked, let the rice rest, covered, for about 5 minutes before fluffing it with a fork or rice paddle. Keep it warm while you prepare the remaining ingredients.
Step 2: Make the Quick-Pickled Cucumber
Place the sliced cucumber in a bowl with 2 tablespoons of rice vinegar, 1 teaspoon of sugar, and 1/4 teaspoon of salt. Toss gently until the cucumber is evenly coated. Leave it for 15 to 20 minutes, stirring once during that time.
The cucumber will soften slightly while keeping its crunch. Its light acidity is particularly useful in this bowl because it cuts through the richness of the fried chicken. Prepare the cabbage and carrot separately and keep them refrigerated until serving.
Step 3: Prepare the Homemade Katsu Sauce
In a small bowl, combine the ketchup, Worcestershire sauce, soy sauce, honey or brown sugar, rice vinegar, and grated ginger. Whisk until smooth. Taste the sauce before adding anything else. If it seems too thick, stir in a teaspoon of water. For a sweeter sauce, add a little more honey. For a sharper finish, add a few extra drops of rice vinegar.
Set the sauce aside. There is no need to cook it, although you can warm it gently in a small saucepan if you prefer serving it warm.
Step 4: Prepare the Chicken Breasts
Place the chicken breasts on a cutting board and slice each one horizontally to make two thinner cutlets. You should have four pieces of approximately equal thickness. If any pieces are noticeably thicker, place them between two sheets of parchment paper and gently pound them to an even thickness of about 1/2 inch.
Pat the chicken dry with paper towels. This helps the flour stick properly and prevents excess moisture from interfering with the breadcrumb coating.
Step 5: Set Up the Breading Station
Arrange three shallow bowls on your counter. Add the flour, salt, pepper, garlic powder, and optional paprika to the first bowl. Beat the eggs in the second bowl until smooth. Pour the panko breadcrumbs into the third bowl.
Coat each chicken cutlet lightly in the seasoned flour and shake off any excess. Dip it into the beaten eggs, allowing the extra egg to drip away. Finally, press the chicken into the panko breadcrumbs, turning it over to cover both sides.
Place the breaded chicken on a clean tray and let it rest for about 5 minutes. This short resting period helps the coating settle and makes it less likely to separate during cooking.
Also Read: Chicken Katsu Recipe
How to Cook Chicken Katsu on the Stovetop
Step 6: Heat the Oil
Pour enough vegetable oil into a large, heavy-bottomed skillet to reach a depth of approximately 1/4 inch. Heat over medium heat until the oil reaches about 170–175°C (340–350°F). If you do not have a thermometer, drop a few panko crumbs into the oil. They should bubble steadily without immediately turning dark brown.
Step 7: Fry the Chicken
Carefully place one or two breaded cutlets into the hot oil, depending on the size of your skillet. Avoid crowding the pan because it lowers the oil temperature and can leave the coating greasy.
Cook for approximately 3 to 5 minutes per side, adjusting the heat as necessary. The coating should become evenly golden brown while the chicken cooks through. Thicker pieces may need additional time.
Use a meat thermometer to check the thickest part of each cutlet. The internal temperature must reach 74°C (165°F). Transfer the cooked chicken to a wire rack rather than stacking the pieces on a plate. Allow it to rest for 3 minutes before slicing into strips.
How to Make Chicken Katsu in an Air Fryer
The air fryer is a convenient alternative when you want crispy chicken without using a pan of frying oil. The finished coating may be slightly less rich than the pan-fried version, but it can still turn out crunchy and golden.
Step 1: Preheat the Air Fryer
Preheat your air fryer to 190°C (375°F) for about 3 to 5 minutes, or follow your appliance manufacturer’s instructions.
Step 2: Arrange the Breaded Chicken
Lightly spray both sides of the breaded cutlets with cooking oil. Place them in the air fryer basket in a single layer, leaving a little space between each piece. Cook in batches if necessary.
Step 3: Air Fry Until Golden
Air fry for approximately 12 to 16 minutes, flipping the chicken halfway through cooking. Spray any visibly dry breadcrumb patches with a little more oil after turning.
Cooking time depends on the thickness of the chicken and the air fryer model. Check that the thickest part reaches 74°C (165°F) before removing it. Let the chicken rest for 3 minutes, then slice it into strips.
How to Assemble the Perfect Chicken Katsu Bowl
Divide the warm rice evenly among four serving bowls. Add a handful of shredded cabbage and some grated carrot to one side of each bowl. Arrange the sliced chicken katsu over the rice, keeping the pieces slightly overlapping so the crisp coating remains visible.
Add a few slices of the quick-pickled cucumber. Drizzle the homemade katsu sauce over the chicken, or serve it on the side if you want the breading to stay crunchy for longer. Finish with chopped green onions and a sprinkle of toasted sesame seeds.
Serve immediately. The combination is best when the rice is warm, the chicken is freshly cooked, and the vegetables are still cool and crisp.
Also Read: Chicken Tinga Recipe
What You Can Do Better
A few small adjustments can make a noticeable difference to the finished chicken katsu bowl. Most of them have more to do with preparation and timing than adding extra ingredients.
1. Keep the Chicken an Even Thickness
Uneven chicken breasts are one of the most common reasons for dry katsu. A thick section may still be undercooked while the thinner end has already dried out. Slicing and gently pounding the chicken before breading helps every piece cook at roughly the same rate.
2. Use Panko Instead of Regular Breadcrumbs
Regular breadcrumbs tend to produce a finer, denser crust. Panko has larger flakes that create more texture and a lighter crunch. For a particularly crisp coating, press the panko firmly onto the chicken without crushing it into powder.
3. Watch the Oil Temperature
If the oil is too cool, the breadcrumbs absorb more oil before they brown. If it is too hot, the coating can darken before the chicken is fully cooked. Maintaining a moderate, steady frying temperature is more important than rushing the process.
4. Add the Sauce at the Last Moment
Katsu sauce tastes wonderful with the chicken, but it also softens the breadcrumb coating. For maximum crunch, drizzle the sauce just before eating or serve it in a separate small bowl for dipping.
5. Balance the Bowl with Fresh Vegetables
It can be tempting to fill the bowl almost entirely with rice and chicken. However, cabbage, cucumber, and carrot give the meal a fresher finish. Their crisp texture is an important part of what makes each bite interesting.
6. Toast the Panko for Better Air Fryer Color
Air-fried breadcrumbs sometimes remain pale even after the chicken is cooked. To improve their appearance, you can lightly toast the panko in a dry skillet over medium-low heat until it begins to turn golden. Allow it to cool before using it for breading. You will still need a light coating of oil spray when air frying.
Chicken Katsu Bowl Variations
Spicy Chicken Katsu Bowl
Mix 1 tablespoon of mayonnaise with 1 to 2 teaspoons of sriracha and a squeeze of lime juice. Drizzle it over the chicken along with a smaller amount of katsu sauce. This adds a creamy, spicy contrast without changing the main recipe.
Chicken Katsu Bowl with Brown Rice
Replace white rice with cooked brown rice for a nuttier flavor and a chewier texture. Brown rice also generally provides more fiber than refined white rice. Make sure it is fully cooked before you start frying the chicken, as it usually takes longer to prepare.
Chicken Katsu Curry Bowl
Serve the crispy chicken over rice with Japanese-style curry sauce instead of the homemade katsu sauce. Add cooked carrots and potatoes to the curry for a more substantial dinner.
Chicken Katsu Bowl with Extra Vegetables
Try adding steamed broccoli, edamame, shredded red cabbage, or thinly sliced radishes. These ingredients make the bowl more colorful and provide additional vegetables without requiring major changes to the cooking method.
Also Read: Grilled Chicken Recipe
Nutritional Information for Chicken Katsu Bowl
The following values are approximate estimates for one of four servings of the air-fried recipe, including rice, sauce, and vegetables. They assume approximately 600 g of raw chicken breast, 3 cups of cooked rice, and about 2 teaspoons of cooking oil used across the entire recipe. Actual values will vary depending on the amount of breading retained, ingredient brands, portion sizes, and how much sauce is served.
| Nutrient | Approximate Amount Per Serving |
|---|---|
| Calories | 650 kcal |
| Protein | 47 g |
| Total Carbohydrates | 84 g |
| Dietary Fiber | 4 g |
| Total Sugars | 10 g |
| Total Fat | 13 g |
| Saturated Fat | 3 g |
| Cholesterol | 190 mg |
| Sodium | 1,150 mg |
Nutrition note: These figures are estimates rather than laboratory-tested results. Pan-frying can increase the calorie and fat content depending on how much oil the breading absorbs. Using reduced-sodium soy sauce, smaller portions of sauce, or additional vegetables can help adjust the meal to your preferences.
What to Serve with Chicken Katsu Bowl
Because the bowl already contains protein, rice, and vegetables, it can easily stand alone as a complete meal. If you are preparing a larger Japanese-inspired dinner, a few simple side dishes pair especially well with it.
- Miso soup: A light, savory soup that complements the crispy chicken without making the meal feel too heavy.
- Steamed edamame: A simple side that adds extra plant-based protein and fiber.
- Seaweed salad: A refreshing option with a slightly salty flavor and a different texture.
- Steamed broccoli: An easy vegetable side that works well with leftover katsu sauce.
- Pickled radish: A tangy accompaniment that helps balance the richness of the breaded chicken.
How to Store and Reheat Chicken Katsu Bowl
Refrigerating Leftovers
Store the cooked chicken, rice, sauce, and vegetables in separate airtight containers. Refrigerate cooked food promptly, ideally within 2 hours of preparation. Properly refrigerated cooked chicken generally keeps for 3 to 4 days. For the best quality and food safety, use cooked rice within 24 hours, refrigerating it as quickly as possible after cooking.
Keeping the ingredients separate prevents the breadcrumbs from becoming soggy and helps the vegetables maintain their texture.
Reheating in an Air Fryer
Preheat the air fryer to 180°C (350°F). Place the refrigerated chicken in the basket and heat for approximately 3 to 5 minutes, or until thoroughly hot. Larger pieces may need longer. Reheat leftovers to an internal temperature of 74°C (165°F).
Reheating in the Oven
Place the chicken on a wire rack over a baking tray and heat in a preheated oven at 190°C (375°F) for approximately 8 to 12 minutes, until heated through. The rack allows warm air to circulate around the coating and helps restore some crispness.
Can You Freeze Chicken Katsu?
Yes. Cooked chicken katsu can be frozen separately from the rice and fresh vegetables. Allow the chicken to cool safely, then place the pieces in a freezer-safe container with parchment paper between layers. Freeze for up to 2 to 3 months for best quality. Reheat thoroughly before serving.
Also Read: Piccata Chicken Recipe
Frequently Asked Questions
Can I Make Chicken Katsu Without an Air Fryer?
Absolutely. Pan-frying is a classic way to prepare chicken katsu and produces a beautifully crisp coating. Use a skillet with enough oil for shallow frying, maintain a moderate temperature, and cook until the chicken reaches 74°C (165°F) internally.
Can I Use Chicken Thighs Instead of Chicken Breasts?
Yes. Boneless, skinless chicken thighs work very well because they remain juicy during cooking. Trim any excess fat, flatten the pieces to an even thickness, and adjust the cooking time as needed. Always check the internal temperature rather than relying only on appearance.
What Is the Difference Between Chicken Katsu and Fried Chicken?
Chicken katsu is typically made with thin cutlets coated in flour, egg, and panko breadcrumbs. Many other fried chicken recipes use seasoned flour or batter instead. The panko coating gives katsu its distinctive flaky crunch, and it is commonly served sliced with rice, cabbage, and a savory-sweet sauce.
Can I Make Chicken Katsu Bowl Ahead of Time?
Yes. The sauce and sliced vegetables can be prepared in advance and stored in the refrigerator. You can also bread the chicken several hours before cooking, keeping it covered and refrigerated. For the best texture, cook the chicken shortly before serving.
What Rice Is Best for Chicken Katsu Bowl?
Japanese short-grain rice is an excellent choice because its slightly sticky texture makes it easy to eat with chopsticks. Jasmine rice is another good option if you prefer a softer, more fragrant base. Brown rice also works when you want a heartier bowl.
How Do I Keep Chicken Katsu Crispy?
Start by patting the chicken dry before breading. Avoid overcrowding the frying pan or air fryer, and transfer cooked pieces to a wire rack instead of piling them together. Add sauce immediately before serving to keep the coating from absorbing too much moisture.
Can I Make Chicken Katsu Bowl Gluten-Free?
Yes, with a few substitutions. Use gluten-free flour and gluten-free panko breadcrumbs, replace regular soy sauce with certified gluten-free tamari, and check that your Worcestershire sauce and other packaged ingredients are gluten-free. The cooking process remains essentially the same.