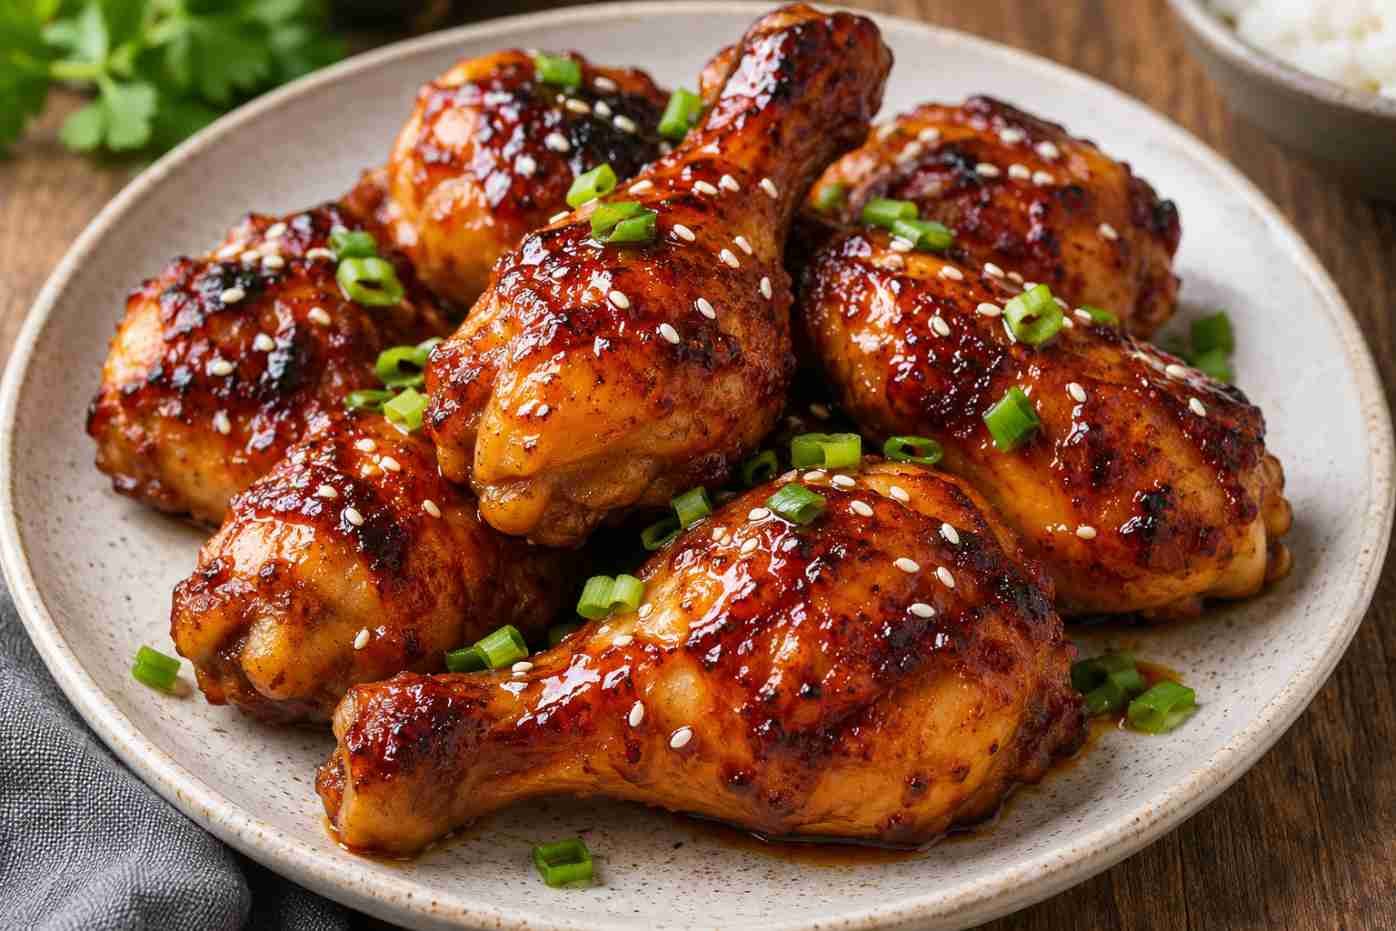
These sticky chicken drumsticks are the sort of dinner that looks as though you spent the afternoon preparing it, even though most of the work happens in the oven. The sauce is made with everyday ingredients: honey, soy sauce, garlic, ginger, and a little vinegar to balance the sweetness. As the chicken roasts, the sauce thickens and clings to the drumsticks. A few rounds of basting help build that shiny, flavorful coating without requiring any complicated cooking techniques.
Serve them with steamed rice, roasted potatoes, or a simple cabbage salad. They also work well for casual gatherings because the chicken can be marinated ahead of time and baked shortly before everyone arrives.
Sticky Chicken Drumsticks Recipe Overview
| Recipe Details | Information |
|---|---|
| Preparation Time | 15 minutes |
| Marinating Time | 30 minutes (optional) |
| Cooking Time | 45–55 minutes |
| Total Time | 60–70 minutes, excluding marinating |
| Servings | 4 |
| Cooking Method | Oven-baked |
| Difficulty | Easy |
| Flavor Profile | Sweet, savory, garlicky, mildly tangy |
Ingredients for Sticky Chicken Drumsticks
The ingredients are straightforward, and most can be found in a reasonably well-stocked kitchen. The important thing is getting the balance right between sweetness, saltiness, and acidity.
For the Chicken
- 8 medium chicken drumsticks, approximately 1.2 kg (2.6 lb), skin-on
- 1 tablespoon neutral cooking oil
- 1/2 teaspoon freshly ground black pepper
- 1/2 teaspoon smoked paprika
For the Sticky Glaze
- 1/4 cup honey
- 3 tablespoons low-sodium soy sauce
- 2 tablespoons tomato ketchup
- 1 tablespoon brown sugar
- 1 tablespoon apple cider vinegar
- 1 tablespoon freshly grated ginger
- 4 garlic cloves, finely minced
- 1 teaspoon toasted sesame oil
- 1/2 teaspoon red chili flakes (optional)
- 2 tablespoons water
For Garnishing
- 1 tablespoon toasted sesame seeds
- 2 spring onions, finely sliced
- Fresh coriander leaves, optional
Also Read: Crispy Baked Chicken Drumsticks
How to Make Sticky Chicken Drumsticks
The process is simple, but the order matters. Giving the chicken enough time to roast before adding the finishing layers of glaze prevents the sauce from burning while the meat is still cooking.
Step 1: Prepare the Chicken
Take the drumsticks out of their packaging and pat them dry with kitchen paper. Removing excess moisture helps the surface brown instead of steaming. Place the chicken in a large mixing bowl, add the cooking oil, black pepper, and smoked paprika, and toss until evenly coated. There is no need to add extra salt at this stage because the soy sauce in the glaze provides plenty of seasoning.
Step 2: Mix the Glaze
In a separate bowl, combine the honey, low-sodium soy sauce, tomato ketchup, brown sugar, apple cider vinegar, grated ginger, minced garlic, sesame oil, chili flakes, and water. Whisk until the honey and sugar are well incorporated. The sauce should be fairly thin at this point. It will become thicker and stickier during cooking. Taste a small amount before it touches the raw chicken. It should be noticeably sweet and savory, with enough acidity to keep it from tasting heavy.
Step 3: Marinate the Drumsticks
Pour approximately half of the glaze over the chicken and toss until every drumstick is coated. Keep the remaining glaze in a separate covered bowl for basting. If you have time, cover the chicken and refrigerate for 30 minutes to 2 hours. Marinating is optional, but it gives the garlic and ginger a little more time to season the surface. Do not use marinade that has touched raw chicken as a finishing sauce unless it has been thoroughly boiled.
Step 4: Preheat the Oven
Preheat your oven to 200°C (400°F), or 180°C (350°F) for a fan-assisted oven. Line a large rimmed baking tray with baking paper or lightly grease a suitable roasting dish. Arrange the drumsticks in a single layer with a little space between them. Pour any marinade remaining in the chicken bowl over the pieces. Avoid overcrowding the tray because tightly packed chicken releases moisture and browns less effectively.
Step 5: Roast the Chicken
Place the tray on the middle rack and roast for 20 minutes. Remove it carefully, turn the drumsticks using tongs, and brush them with some of the reserved glaze. Return the tray to the oven for another 15 minutes. At this point, the chicken should be beginning to brown, and the sauce collecting around the pieces should be bubbling.
Step 6: Build the Sticky Coating
Turn the drumsticks once more and brush with another layer of reserved glaze. Continue roasting for 10–20 minutes, checking regularly toward the end. Brush with the remaining reserved glaze during the final few minutes if it has not started to burn. The chicken is ready when the surface is glossy and caramelized and the thickest part of each drumstick reaches at least 74°C (165°F), measured without touching the bone. Drumsticks often become more tender when cooked to around 80–85°C (176–185°F). If the glaze is darkening too quickly, loosely cover the tray with foil and continue cooking until the chicken is done.
Step 7: Rest and Serve
Remove the tray from the oven and allow the chicken to rest for 5 minutes. Sprinkle with toasted sesame seeds and sliced spring onions. Serve while warm, with rice or vegetables to soak up the flavorful juices. If you want to use the juices from the roasting tray as a sauce, transfer them to a small saucepan, bring them to a full boil, and cook until slightly reduced.
What You Can Do Better
Good sticky chicken is not simply chicken covered with a sweet sauce. A few small adjustments can make a noticeable difference in the texture, color, and overall flavor.
1. Dry the Chicken Before Seasoning
Wet chicken tends to steam during the early stages of roasting. Patting the drumsticks dry helps the surface brown and allows the glaze to coat the meat more evenly. It takes less than a minute, but it makes a difference.
2. Use Low-Sodium Soy Sauce
The glaze reduces as it cooks, which concentrates the salty flavor. Low-sodium soy sauce gives you more control over the finished dish. If you only have regular soy sauce, start with 2 tablespoons and replace the remaining tablespoon with water.
3. Keep Some Glaze Separate
Rather than pouring every drop of sauce over the raw chicken, reserve a portion for basting. This allows you to apply a clean, fresh layer during the later stages of roasting, when the chicken is hot enough for the glaze to thicken quickly.
4. Avoid Adding Too Much Honey
Honey gives the chicken its attractive shine, but using too much can cause the surface to scorch before the meat is completely cooked. The brown sugar and ketchup already contribute sweetness, so there is no need to make the glaze excessively sugary.
5. Watch the Chicken During the Final 10 Minutes
The difference between caramelized and burnt glaze can be surprisingly small. Oven temperatures vary, particularly when using dark metal roasting trays. Keep an eye on the chicken near the end and adjust the heat if necessary.
6. Use a Meat Thermometer
Chicken drumsticks can look beautifully browned while the meat near the bone is still undercooked. A thermometer is a more dependable guide than color alone. For especially tender drumsticks, cooking slightly beyond the minimum safe temperature can help soften the connective tissue.
Also Read: Honey Soy Baked Chicken Drumsticks
What to Serve with Sticky Chicken Drumsticks
Because the glaze is rich and strongly flavored, simple side dishes usually work best. Steamed jasmine rice is a particularly good choice because it balances the sweetness and absorbs the sauce. For a more substantial dinner, roasted baby potatoes or mashed potatoes work just as well.
If you would prefer something lighter, try shredded cabbage tossed with lime juice, cucumber salad, or lightly steamed broccoli. The fresh vegetables provide a welcome contrast to the sticky coating. For casual family dinners, corn on the cob and a crunchy coleslaw make an easy combination.
Easy Variations
Spicy Sticky Chicken Drumsticks
Add 1 tablespoon of sriracha or another chili sauce to the glaze. Reduce the honey slightly if the chili sauce is sweetened. The result is a pleasantly spicy chicken dish with a balanced sweet finish.
Orange and Ginger Drumsticks
Replace the water with fresh orange juice and add 1 teaspoon of finely grated orange zest. This version has a brighter, fruitier flavor that works particularly well with steamed rice and green vegetables.
Garlic and Black Pepper Drumsticks
Increase the garlic to 6 cloves and add another 1/2 teaspoon of freshly cracked black pepper. Reduce the brown sugar to 1 teaspoon if you prefer a more savory glaze.
Boneless Chicken Thigh Version
Boneless chicken thighs can be used instead of drumsticks. They generally require less roasting time, so begin checking their internal temperature after approximately 20–25 minutes. Apply the glaze in stages and continue cooking until the chicken reaches a safe internal temperature.
Also Read: Crispy Bizarrely Good Wings
How to Store and Reheat Leftovers
Refrigeration
Allow the cooked chicken to cool briefly, then refrigerate it in a covered, airtight container within 2 hours of cooking. It can be stored in the refrigerator for up to 3–4 days at 4°C (40°F) or below. Keep any sauce in a separate container if possible.
Freezing
Sticky chicken drumsticks can be frozen for up to 3 months for best quality. Place the completely cooled pieces in a freezer-safe container or bag, removing as much excess air as possible. Thaw overnight in the refrigerator before reheating.
Reheating
Arrange the chicken in an oven-safe dish, add a tablespoon or two of water, and cover loosely with foil. Reheat at 180°C (350°F) until thoroughly heated through to 74°C (165°F). For a stickier finish, remove the foil during the final few minutes. A microwave also works, although the skin will be softer.
Nutritional Information
The following values are approximate estimates per serving, based on 2 medium skin-on drumsticks and one-quarter of the prepared glaze. Actual nutrition will depend on the size of the drumsticks, the amount of sauce consumed, and the ingredients used. Side dishes are not included.
| Nutrient | Approximate Amount Per Serving |
|---|---|
| Calories | 420 kcal |
| Protein | 38 g |
| Total Fat | 20 g |
| Saturated Fat | 5 g |
| Carbohydrates | 23 g |
| Sugars | 20 g |
| Dietary Fiber | Less than 1 g |
| Sodium | 650 mg |
| Cholesterol | Approximately 145 mg |
Nutrition Note: These figures are rough estimates rather than laboratory-tested values. Some fat and glaze may remain in the roasting tray, which can change the final nutritional content.
Frequently Asked Questions
Can I Make Sticky Chicken Drumsticks Without Honey?
Yes. Maple syrup can replace honey in equal quantities, although the flavor will be slightly different. Brown sugar dissolved in a little warm water is another option. Remember that different sweeteners caramelize differently, so watch the glaze closely while roasting.
Can I Prepare This Recipe the Night Before?
Yes. Coat the drumsticks with the marinade, cover them, and refrigerate overnight. Keep the reserved basting glaze in a separate container. When you are ready to cook, arrange the chicken on a tray and roast as directed, checking the internal temperature before serving.
Why Is My Chicken Glaze Not Sticky?
The glaze may still contain too much moisture, or it may not have had enough time to reduce. Continue roasting for a few minutes while watching carefully. A thin coating applied several times generally produces better results than one thick layer added at the beginning.
Can I Use Frozen Drumsticks?
Frozen drumsticks should be fully thawed in the refrigerator before marinating and roasting. This allows them to cook more evenly and makes it easier for the glaze to cling to the surface. Do not thaw raw chicken at room temperature.
Can I Cook These Drumsticks in an Air Fryer?
Yes. Preheat the air fryer to approximately 190°C (375°F). Arrange the drumsticks in a single layer and cook for around 22–28 minutes, turning halfway through. Brush with the reserved glaze during the final 8–10 minutes, checking frequently to prevent scorching. Cooking time varies with drumstick size and air fryer model, so confirm that the thickest part reaches at least 74°C (165°F).
How Do I Stop the Glaze from Burning?
Apply most of the glaze after the chicken has already spent some time in the oven, avoid placing the tray too close to the upper heating element, and check regularly as the sauce darkens. If needed, reduce the oven temperature slightly or cover the chicken loosely with foil.