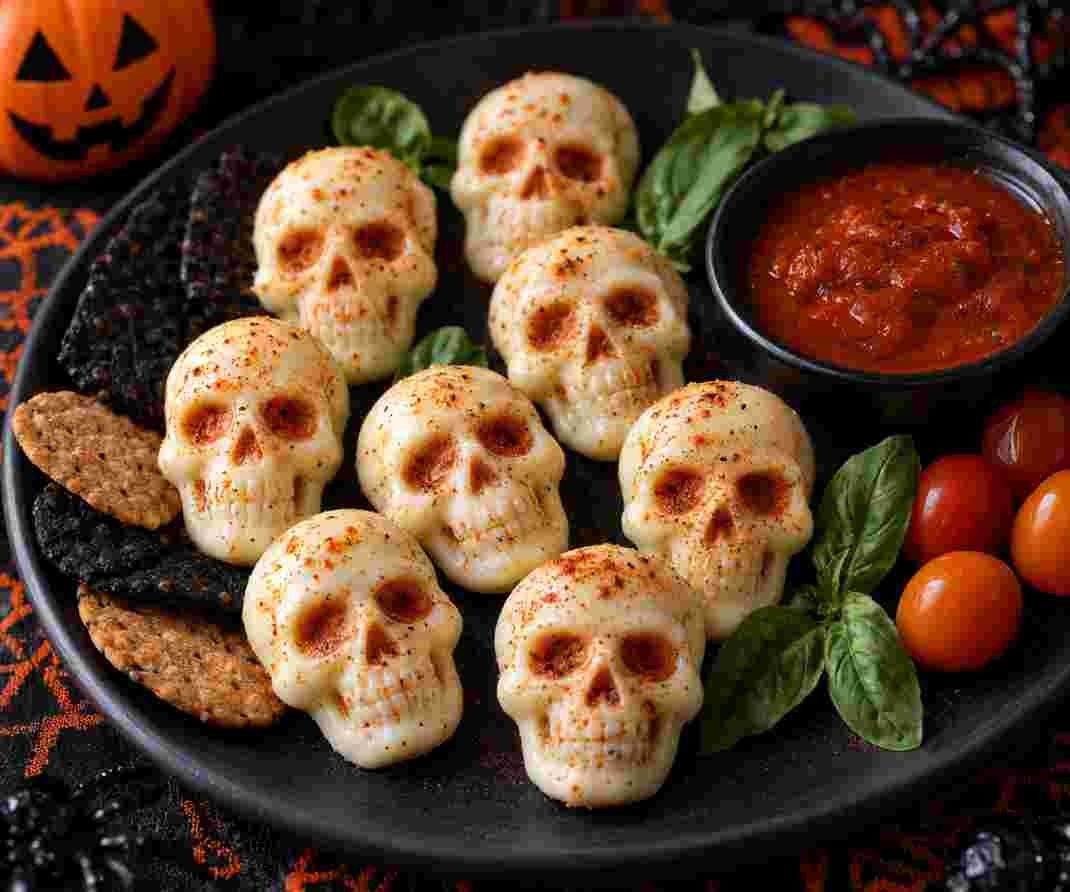
These Halloween Mozzarella Skulls are a simple way to turn an ordinary cheese snack into something spooky for Halloween. Soft fresh mozzarella is warmed until pliable, pressed into a skull-shaped silicone mold, and chilled until the cheese holds its shape. They take very little effort and can be served on a Halloween snack board, with crackers, in a salad, or as a fun topping for appetizers.
What Are Halloween Mozzarella Skulls?
Halloween Mozzarella Skulls are fresh mozzarella pieces shaped into little skulls using a silicone candy or ice-cube mold. The cheese becomes soft with gentle heating, which makes it easier to press into the details of the mold. Once chilled, the mozzarella firms up and keeps the skull shape.
The trick is not to overheat the cheese. You only want it soft enough to press into the mold. A little paprika or chili powder can also be brushed over the finished skulls to make the eyes, nose, and other details stand out.
Ingredients
| Ingredient | Amount | Notes |
|---|---|---|
| Fresh mozzarella balls | 6 ounces | Small ciliegine, pearl, or similar-sized mozzarella works well |
| Cooking spray or neutral oil | As needed | For lightly greasing the silicone mold |
| Paprika | Optional | For highlighting the skull details |
| Chili powder | Optional | For a slightly darker and spicier finish |
Equipment You’ll Need
- Skull-shaped silicone mold
- Baking sheet if using the oven
- Paper towels or a clean cloth
- Microwave or oven
- Airtight container for storage
Also Read: Bourbon Margarita
How to Make Halloween Mozzarella Skulls
1. Prepare the Skull Mold
Lightly coat the inside of a clean silicone skull mold with cooking spray or a small amount of neutral oil. You do not need much; a thin coating is enough to make releasing the cheese easier.
2. Add the Mozzarella
Place one small mozzarella ball into each skull cavity. If your mold is larger than the cheese balls, you can use a couple of smaller mozzarella pearls in the same cavity so the cheese fills the shape properly.
3. Warm the Cheese
For the oven method, place the filled silicone mold on a baking sheet for stability. Heat the oven to 350°F (175°C) and warm the cheese for about 6 to 8 minutes. The mozzarella should become soft and flexible rather than completely melted.
For the microwave method, place the mold flat in the microwave and heat the cheese on high for about 30 seconds. Check the texture and continue heating in short 10 to 20 second intervals if necessary. Microwave power varies, so keep a close eye on the cheese.
4. Press the Mozzarella Into the Mold
Carefully remove the warm mold because the cheese and silicone may be hot. Fold a paper towel or clean cloth and gently press down on each softened mozzarella ball. This pushes the cheese into the skull details while also absorbing some of the excess moisture.
Do not worry if the skulls look a little uneven at this stage. While the cheese is still warm, you can gently push it into empty areas of the mold to improve the shape.
5. Chill the Skull Shapes
Place the filled mold in the refrigerator for about 10 minutes. Chilling allows the mozzarella to firm up and helps it hold the skull shape.
6. Remove the Mozzarella Skulls
Once the cheese has cooled, gently press around the back of each skull cavity and loosen the edges. Carefully lift the mozzarella skulls from the mold.
If a little cheese extends beyond the shape, trim it carefully with a small knife after the cheese has cooled.
7. Add a Spooky Finish
For a more dramatic Halloween look, lightly brush the finished mozzarella skulls with paprika or a small amount of chili powder. Concentrating the seasoning around the eyes, nose, and edges can make the molded details easier to see.
Also Read: Garlic Potato Soup
What You Can Do Better
- Use the right mozzarella: Small fresh mozzarella balls are easier to fit into skull molds than large mozzarella balls.
- Do not overheat the cheese: The mozzarella only needs to become soft enough to shape. Too much heat can make it greasy and difficult to handle.
- Fill the mold properly: If the cavity is too large for one cheese ball, add extra mozzarella pearls so the finished skull does not have thin or empty sections.
- Press while warm: This is the stage where you can improve the definition of the skull’s face.
- Remove excess moisture: Fresh mozzarella contains plenty of liquid, so gently pressing with a paper towel helps the cheese set more cleanly.
- Chill before unmolding: Give the cheese enough time to firm up. Trying to remove it while it is still warm can damage the skull shape.
- Make the details darker: A tiny amount of paprika or chili powder around the facial features gives the skulls more definition.
How to Serve Halloween Mozzarella Skulls
These little cheese skulls are more versatile than they might look. Arrange them on a Halloween cheese board with crackers, olives, grapes, nuts, and cured meats. You can also place them on crostini or toast with olive tapenade for an easy party appetizer.
For a lighter option, add the skulls to a Caprese salad with tomatoes and basil. They can also be placed on pasta salad, a vegetable platter, soup, chili, or a Halloween grazing board. Their small size makes them especially useful when you want individual spooky decorations rather than one large centerpiece.
Also Read: Butter Pecan Cookies
Can You Make Halloween Mozzarella Skulls Ahead?
Yes. The skulls can be prepared ahead of time and kept refrigerated in an airtight container. Keeping them cold helps the mozzarella maintain its shape until you are ready to serve them.
How to Store Them
Store the finished mozzarella skulls in an airtight container in the refrigerator. For the best texture and appearance, use them within several days. If you need to keep them longer, they can also be frozen in a suitable airtight container or freezer bag and then thawed slowly in the refrigerator.
Oven vs. Microwave
| Method | Approximate Time | Best For |
|---|---|---|
| Oven | 6–8 minutes | Making several skulls at once |
| Microwave | About 30 seconds, plus extra short intervals if needed | Making a small batch quickly |
If you use the microwave, make sure the silicone mold is specifically microwave-safe and does not contain any metal components.
Nutrition Information
The approximate nutrition will depend on the mozzarella brand, size of the cheese balls, and any optional seasoning used. Based on a small mozzarella skull made from fresh mozzarella, the estimated nutrition is:
| Nutrient | Approximate Amount |
|---|---|
| Calories | 28 kcal |
| Carbohydrates | 0.2 g |
| Protein | 2 g |
| Total Fat | 2 g |
| Saturated Fat | 1 g |
| Cholesterol | 7 mg |
| Sodium | 59 mg |
| Calcium | 48 mg |
| Sugar | 0.1 g |
| Iron | 0.04 mg |
Nutrition information is an estimate and can vary depending on the brand of mozzarella, serving size, and other ingredients used.
Also Read: Double Chocolate Chip Cookie
Tips for the Best Halloween Mozzarella Skulls
- Use fresh mozzarella that is small enough to fit comfortably inside the mold.
- Drain the mozzarella well before using it if it is packed in liquid.
- Grease the mold lightly rather than heavily.
- Heat the cheese only until it becomes soft and pliable.
- Use a folded paper towel to press the cheese and absorb moisture at the same time.
- Let the skulls chill completely before removing them from the mold.
- Add paprika or chili powder only after shaping if you want the facial details to stand out.
Frequently Asked Questions
What type of mozzarella is best for Halloween mozzarella skulls?
Small fresh mozzarella balls, such as ciliegine or mozzarella pearls, work well because they fit easily into small skull-shaped cavities. Larger mozzarella balls can be cut into smaller pieces if necessary.
Can I make mozzarella skulls without an oven?
Yes. A microwave can soften the mozzarella quickly, making it possible to prepare these without using an oven. Heat the cheese in short intervals until it becomes soft enough to press into the mold.
Why are my mozzarella skulls not holding their shape?
The cheese may have been too warm when you removed it from the mold. Chill the filled mold thoroughly before unmolding. Also make sure the cheese was pressed firmly into the facial details while it was soft.
Can I use mozzarella pearls?
Yes. If the pearls are smaller than your mold cavities, use enough pearls to fill each cavity. The pieces will soften and join together when heated.
Can I add seasoning to the mozzarella?
Yes. Paprika and chili powder work particularly well for creating a darker Halloween appearance. You can also experiment with mild dried herbs, although too much seasoning can hide the skull details.
What can I serve with mozzarella skulls?
Serve them with crackers, crostini, olives, tomatoes, salads, pasta salad, soup, chili, or a Halloween cheese and snack board. They are also a fun topping for small appetizers.