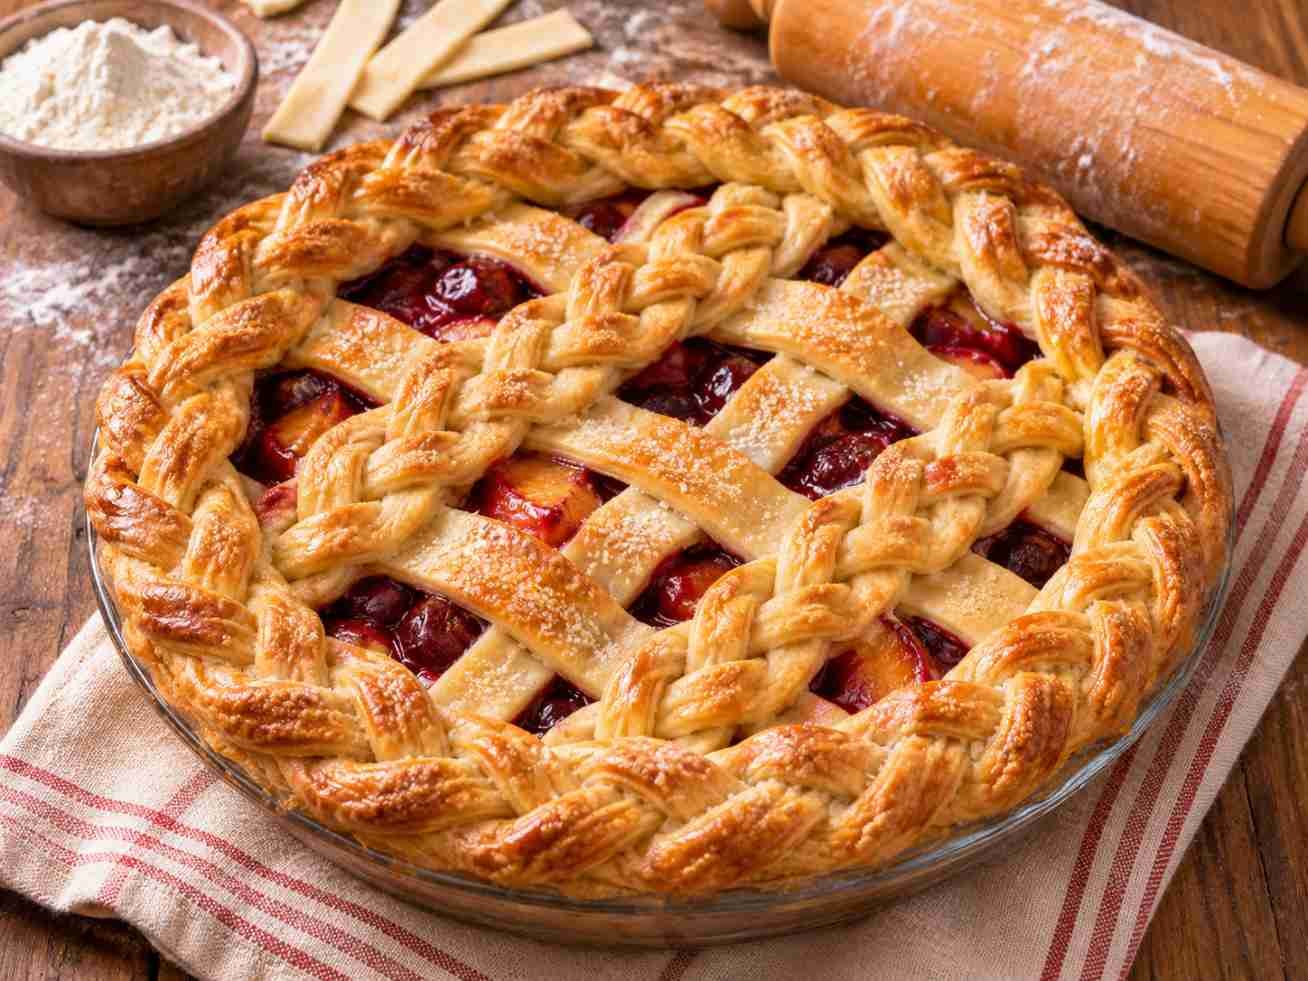
A homemade pie is already something special, but adding a braided crust makes it look like it came straight from a bakery window. Those little twists of golden pastry give an ordinary fruit pie a beautiful finish, and the best part is that you don’t need any special decorating equipment to make them.
Learning how to braid pie crust is easier than it looks. If you can make a simple three-strand braid, you can decorate a pie. The only tricky part is keeping the dough cold enough to handle without tearing. Once you’ve figured that out, you can use braided pastry for pie borders, lattice toppings, or even small decorative accents.
This guide covers everything from preparing homemade pie dough to weaving a neat braid and baking it until golden. You can also use the same technique with your favorite store-bought pastry if you’d rather skip making the dough from scratch.
How to Braid Pie Crust at a Glance
| Details | Information |
|---|---|
| Preparation Time | 25 minutes |
| Dough Chilling Time | At least 2 hours |
| Baking Time | Approximately 45–60 minutes, depending on the pie |
| Total Time | About 3 hours 10 minutes to 3 hours 25 minutes |
| Difficulty | Intermediate |
| Yield | Enough dough for one 9-inch pie with a bottom crust and braided decorations |
| Best For | Apple, cherry, peach, and berry pies |
Ingredients for Braided Pie Crust
A good braided crust starts with pastry that is buttery, flexible, and sturdy enough to hold its shape. This all-butter dough uses a few basic ingredients and works well for both the bottom crust and the decorative braids.
For the Homemade Pie Dough
- 2 1/2 cups (315 g) all-purpose flour
- 1 cup (226 g) unsalted butter, cold and cut into small cubes
- 1 teaspoon salt
- 1 tablespoon granulated sugar
- 6–8 tablespoons ice-cold water, as needed
For the Egg Wash
- 1 large egg
- 1 tablespoon milk or water
- 1 tablespoon coarse sugar, optional
Ingredient Note: If you plan to cover the entire pie with a tightly woven braided lattice, prepare an additional half batch of dough. Decorative braids use more pastry than ordinary lattice strips. The amount listed above is best suited to a bottom crust with a braided border or a combination of braids and plain strips.
Also Read: Chocolate Peanut Butter Bars
Equipment You’ll Need
- Rolling pin
- Sharp knife, pastry wheel, or pizza cutter
- Parchment paper
- Ruler for measuring evenly sized strips
- 9-inch pie dish
- Pastry brush
- Baking sheet
- Mixing bowl
A ruler is particularly helpful when you’re making several braids. Strips that are roughly the same width produce a much neater pattern, although they certainly don’t have to be perfect.
How to Make Braided Pie Crust Step by Step
Step 1: Prepare the Pie Dough
In a large mixing bowl, combine the flour, salt, and sugar. Add the cold butter cubes and work them into the flour using a pastry cutter or your fingertips. Stop when the mixture contains small pieces of butter, with some roughly the size of peas.
Add the ice water one tablespoon at a time, gently mixing after each addition. The dough should hold together when squeezed but should not feel wet or sticky. You may not need all the water.
Turn the dough onto a clean surface and bring it together without kneading. Divide it into two portions, making one slightly larger for the decorative top. Flatten each portion into a disk, wrap tightly, and refrigerate for at least 2 hours.
Important: Avoid working the dough for too long. Overmixing can develop excess gluten and make the baked pastry tougher instead of tender and flaky.
Step 2: Roll Out the Bottom Crust
Take the smaller dough disk from the refrigerator and place it on a lightly floured surface. Roll it into a circle approximately 12 inches wide and about 1/8 inch thick.
Carefully transfer the pastry into a 9-inch pie dish. Gently press it against the bottom and sides without stretching. Trim the edges, leaving a little overhang for sealing the top decoration.
Place the lined pie dish back in the refrigerator while you prepare the braids. Keeping the bottom crust cold helps prevent the butter from softening before baking.
Step 3: Roll Out the Dough for Braiding
Place the remaining chilled dough between two sheets of lightly floured parchment paper. Roll it into a rectangle approximately 1/8 inch thick. A rectangular shape makes cutting long, straight strips much easier.
If the dough becomes soft or starts sticking to the paper, transfer it to the refrigerator for 10–15 minutes before continuing.
Don’t try to force warm dough into a braid. It will stretch, stick to your fingers, and may break when you lift it.
Step 4: Cut the Dough into Even Strips
Remove the top parchment sheet and use a pastry wheel or sharp knife to cut the rolled dough into strips about 3/8 inch wide.
You’ll need three strips for each braid. For example, if you want to make four decorative braids, cut at least twelve strips. It’s useful to prepare a couple of extras in case one tears.
Try to keep the strips similar in width and thickness. Very narrow strips can be difficult to handle, while excessively wide strips make bulky braids that may not bake evenly.
Step 5: Start Braiding the Pie Crust
Place three strips next to one another on a lightly floured piece of parchment paper. Gently press their upper ends together to form a single starting point.
Move the right strip over the middle strip. Next, bring the left strip over the new middle strip. Continue alternating sides, crossing each outside strip over the center.
Keep the braid relaxed rather than pulling the strips tightly. Pie dough is more delicate than bread dough, and stretching can cause the strips to become thin or break.
When you reach the end, gently pinch the three strips together. You now have one finished pastry braid.
Step 6: Make the Remaining Braids
Repeat the same process with the remaining strips. Place each completed braid on a parchment-lined baking sheet and refrigerate it while you work on the next one.
If a strip cracks during braiding, press the broken pieces together with your fingertips. Small repairs are usually barely noticeable after the crust bakes.
For a cleaner appearance, avoid dusting the dough with too much flour. Use only enough to keep it from sticking.
Step 7: Decorate the Pie
Once your filling is ready, spoon it into the chilled bottom crust. The filling should be prepared according to your chosen pie recipe, including any required thickener.
Carefully lift the braided pastry using both hands or the parchment underneath it. Arrange the braids across the filling, around the edge, or as part of a decorative lattice pattern.
For a braided border, position the pastry along the rim of the pie. Use a little water or egg wash to help it adhere to the bottom crust.
If you want a lattice design, alternate the braided strips with plain pastry strips, leaving openings for steam to escape during baking. A combination of braided and plain strips is easier to assemble than an entire lattice made from thick braids.
Step 8: Chill the Assembled Pie
After decorating, refrigerate the assembled pie for 15–20 minutes while the oven preheats. This short rest helps firm up the butter and makes the braided design less likely to lose its definition.
Check that the ends of the braids are attached securely to the outer crust. Loose ends may lift during baking as the pastry expands.
Step 9: Apply the Egg Wash
Whisk together the egg and milk or water until smooth. Using a pastry brush, apply a thin layer over the exposed pastry, including the braids and edges.
Be gentle when brushing the braided strips. Too much pressure can flatten the pattern you’ve worked to create.
Sprinkle coarse sugar over the crust if you’re making a sweet fruit pie. This adds a delicate crunch and a little sparkle to the finished pastry.
Step 10: Bake Until Golden Brown
For a typical 9-inch fruit pie, preheat the oven to 425°F (220°C). Place the assembled pie on a baking sheet to catch any juices that bubble over.
Bake for approximately 15–20 minutes, then reduce the oven temperature to 375°F (190°C) and continue baking for another 30–40 minutes, or until the crust is deeply golden and the fruit filling is bubbling in the center.
The exact baking time depends on the filling, pie dish, and thickness of the pastry. Follow your chosen filling recipe if it specifies different temperatures or baking times.
If the braids brown faster than the filling cooks, loosely cover the top with aluminum foil or protect the rim with a pie shield.
Let a fruit pie cool for at least 2–3 hours before slicing, or follow the cooling directions for your particular filling. This gives the juices time to thicken and helps the slices hold their shape.
Also Read: No Bake Holiday Candies
Three Ways to Decorate a Pie with Braided Crust
1. Classic Braided Pie Border
This is the easiest design to try first. Make one long braid, or several shorter braids, and arrange them around the outside edge of the pie. You can leave the middle open or combine the border with a simple lattice top.
A braided border looks particularly attractive on pumpkin pies, custard pies, and classic fruit pies. For fillings baked separately from the decoration, the pastry braid may need to be baked on its own before being added.
2. Braided Lattice Crust
Instead of using only flat strips to make a lattice, replace some of them with pastry braids. Lay several strips across the pie, then weave additional strips over and under them to form a crisscross design.
This style works especially well for apple, cherry, blueberry, and peach pies. The gaps between the strips let steam escape as the fruit cooks.
3. Double Braided Edge
For a more detailed finish, make two thin braids and position them next to each other around the pie’s rim. Press the ends together neatly and trim away excess dough.
This technique uses more pastry and requires a little patience, but it creates a beautifully textured border without needing complicated pastry-cutting tools.
What You Can Do Better
The difference between a rough-looking braid and a tidy one usually comes down to temperature, thickness, and how much you handle the dough. These small adjustments can make your next pie much easier to decorate.
Keep the Pastry Cold, Not Rock Hard
Cold pastry holds its shape, but dough that’s completely rigid can crack as soon as you bend it. If it has been refrigerated for several hours, let it rest on the counter for a few minutes before braiding. The ideal texture is firm but flexible.
Use Consistent Strip Widths
Cutting the strips evenly helps the braid look balanced. A width of about 3/8 inch is a good starting point for most decorative pie braids. Make slightly wider strips if you’re working with a particularly crumbly dough.
Work on Parchment Paper
Rather than making the braids directly on a warm countertop, assemble them on parchment paper. You can move the entire sheet into the refrigerator whenever the pastry begins to soften.
Don’t Pull the Strips Too Tightly
A loose, even braid looks better after baking than one that’s been pulled tight. Leave a little room for the pastry to expand. Tight braids can develop thin sections that brown too quickly or break when transferred.
Make a Little Extra Dough
Decorative pastry uses more dough than you might expect. Having a small extra portion means you can replace a damaged strip rather than trying to stretch the remaining dough.
Brush Lightly with Egg Wash
Egg wash gives baked pastry a golden finish, but applying too much can collect between the strands and obscure the pattern. Use a soft brush and apply one light, even coat.
Common Pie Crust Braiding Problems and How to Fix Them
| Problem | Possible Cause | How to Fix It |
|---|---|---|
| Dough keeps tearing | Too dry, too thin, or too cold | Allow rigid dough to soften briefly, repair cracks, and cut slightly wider strips. |
| Strips stick together | Butter has become too warm | Refrigerate the strips for 10–15 minutes before continuing. |
| Braid loses its shape | Warm dough or excessive stretching | Handle gently and chill the decorated pie before baking. |
| Crust becomes tough | Dough was overworked | Mix just until combined and avoid kneading. |
| Edges brown too quickly | Thin exposed pastry receives more heat | Cover the edges loosely with foil or a pie shield. |
| Braid breaks when lifted | Unsupported or overly delicate strips | Use both hands or transfer the braid with parchment paper. |
| Braid slides off the edge | Pastry wasn’t attached securely | Use a little water or egg wash to seal the braid to the crust. |
Best Pie Fillings for a Braided Crust
Braided pastry works with most traditional baked fruit fillings. It looks particularly good when some of the fruit is visible through the gaps in the topping.
- Apple Pie: The golden braids pair beautifully with cinnamon-spiced apple filling.
- Cherry Pie: Bright cherry filling provides a striking contrast against the baked pastry.
- Blueberry Pie: A braided lattice lets the deep purple filling show through.
- Peach Pie: The soft orange and golden fruit looks lovely beneath a decorative braided topping.
- Mixed Berry Pie: A combination of berries creates an attractive filling that bubbles between the pastry strips.
For very juicy fillings, use an appropriate thickener such as cornstarch or tapioca starch. A braided lattice has openings that expose the filling, so a watery mixture can bubble over and soften the crust.
Also Read: Lamingtons Recipe
Make-Ahead and Storage Instructions
Refrigerating the Dough
Homemade pie dough can be prepared up to 3 days ahead. Wrap each disk tightly in plastic wrap and store it in the refrigerator. Allow very firm dough to soften slightly before rolling.
Freezing Unbaked Braids
Place completed pastry braids on a parchment-lined tray and freeze until firm. Transfer them carefully to a freezer-safe container with parchment between the layers. For the best quality, use within 2 months.
You can place frozen braids directly onto a prepared pie, provided they’re flexible enough to position without breaking. Long curved borders may be easier to shape before freezing.
Freezing Pie Dough
Wrap the dough disks tightly and freeze for up to 3 months. Thaw overnight in the refrigerator before rolling and shaping.
Storing the Baked Pie
Storage depends on the filling. Most baked fruit pies can be covered and kept at room temperature for up to 2 days, then refrigerated for a further 2 days. Pies containing custard, cream, or other perishable fillings should be refrigerated promptly and kept according to the filling recipe’s instructions.
Nutritional Information
The following values are approximate estimates for one serving of the homemade pastry recipe, assuming the full dough batch, egg wash, and optional sugar are divided into eight equal portions. They do not include fruit filling or extra dough used for elaborate decorations.
| Nutrient | Amount Per Serving |
|---|---|
| Calories | Approximately 420 kcal |
| Total Fat | 25 g |
| Saturated Fat | 15 g |
| Carbohydrates | 44 g |
| Sugars | 3 g |
| Protein | 6 g |
| Fiber | 1 g |
| Sodium | 310 mg |
| Cholesterol | 90 mg |
Nutrition Disclaimer: These figures are estimates, not laboratory-tested values. Actual nutrition will vary according to the ingredients used, the amount of pastry consumed, how much egg wash remains on the crust, and the filling. If you’re making only a braided border, the nutritional contribution of the decoration will be considerably smaller.
Frequently Asked Questions
Can I braid pie crust using store-bought dough?
Yes. Refrigerated store-bought pie dough works well for braiding. Let it soften just enough to unfold or roll without cracking, then cut it into strips. If it becomes sticky, refrigerate it briefly before braiding. You may need an extra sheet of dough for a decorative lattice.
How thick should pie dough be for braiding?
Roll the dough to about 1/8 inch thick and cut it into strips roughly 1/4–1/2 inch wide. Around 3/8 inch is a practical starting point. Slightly thicker strips are easier to handle, but very thick pastry may not bake as evenly.
Can I prepare braided pie crust the night before?
Absolutely. Shape the braids, lay them flat on a parchment-lined tray, cover them carefully, and refrigerate overnight. Keep them chilled until you’re ready to decorate the pie.
Why does my braided crust shrink during baking?
Shrinkage often happens when pastry is stretched while being shaped or hasn’t had enough time to rest. Avoid pulling the strips tightly and chill the assembled pie before baking. Measuring flour accurately and adding enough water to bind the dough also help prevent problems.
Can I use puff pastry instead of regular pie dough?
Yes, although the finished braid will be different. Puff pastry rises into airy layers, making the design thicker and less defined. Traditional pie dough is usually a better choice when you want a neat, detailed braided pattern.
Should I bake the braids before placing them on the pie?
For a traditional fruit pie, arrange the raw braids on the unbaked filling and bake everything together. For a pre-baked custard or cream pie, you can bake separate pastry decorations and add them after cooling. The appropriate method depends on the filling.
Do I need an egg wash for braided pie crust?
No, but it helps create a more attractive golden finish. Without egg wash, the crust will still bake, although the surface may look paler and more matte. A little milk or cream can be used instead, with a somewhat different browning effect.