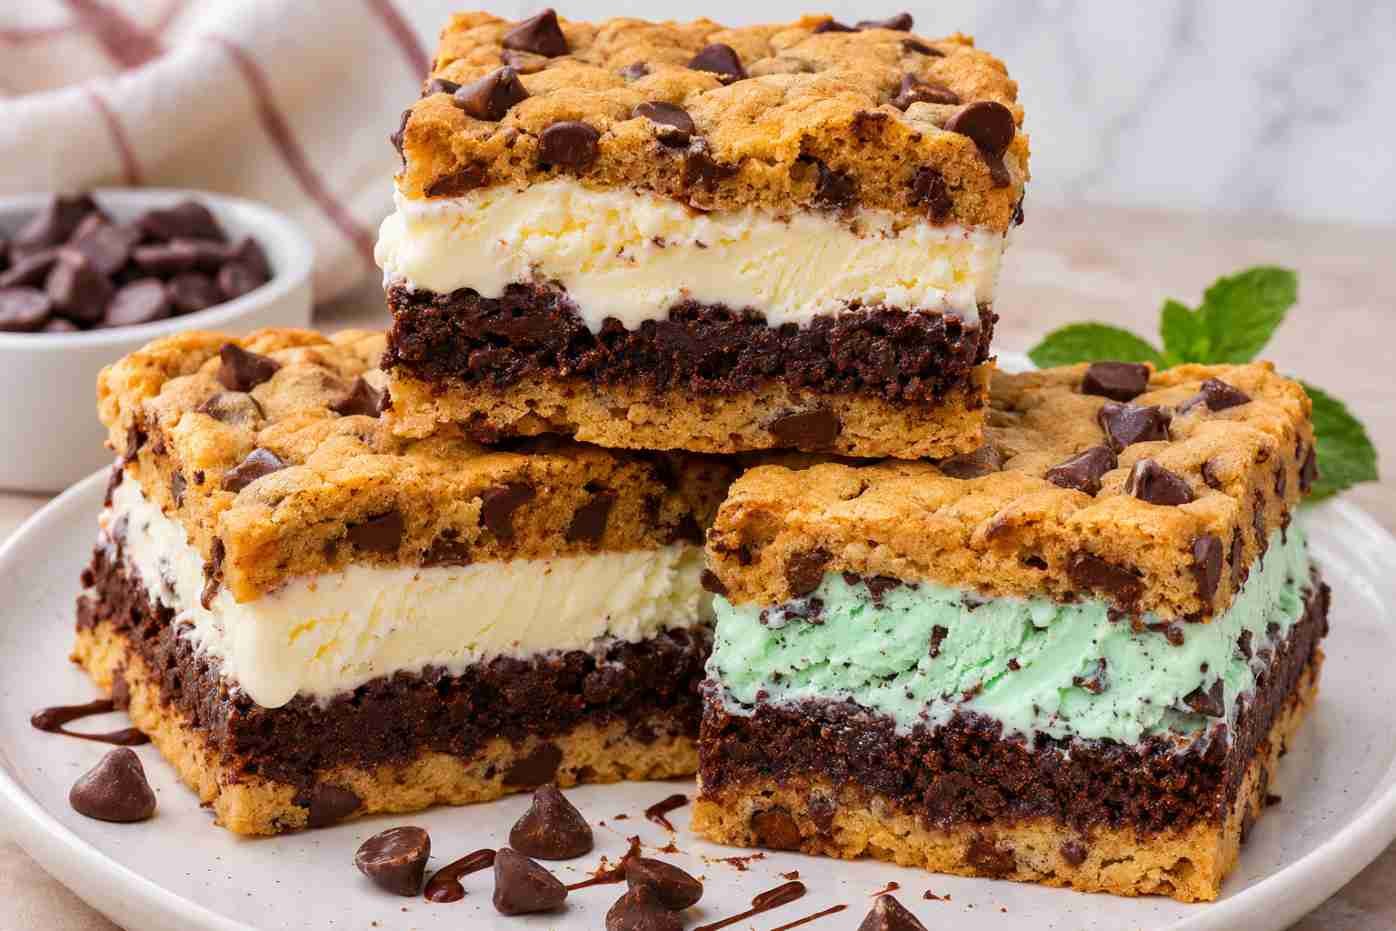
If you love brownies, chocolate chip cookies and ice cream, these Brookie Ice Cream Sandwiches bring all three together in one delicious frozen dessert. Each sandwich has layers of soft chocolate chip cookie, rich fudgy brownie and creamy ice cream. The combination creates a treat that is crunchy around the edges, soft in the middle and wonderfully cold and creamy.
Brookies are already a popular dessert because they combine two classic favourites: brownies and cookies. Turning them into ice cream sandwiches makes them even more exciting. You can prepare the cookie and brownie layers ahead of time, add your favourite ice cream and keep everything in the freezer until you are ready to serve.
What Is a Brookie?
A brookie is a dessert made by combining a brownie and a chocolate chip cookie. The name comes from joining the words brownie and cookie. Some versions mix both batters together, while others have separate cookie and brownie layers. For this recipe, we use individual baked layers to create a thick, freezer-friendly dessert with a different texture in every bite.
What You Can Do Better
The best part about making Brookie Ice Cream Sandwiches at home is that you can adjust the flavours and layers to suit your taste. Here are a few simple ways to make them even better:
- Choose complementary ice cream flavours: Vanilla and mint chocolate chip create a refreshing contrast with the rich brownie and cookie layers. You can also try chocolate, cookies and cream, strawberry or salted caramel.
- Use good-quality chocolate: Semisweet chocolate chips in the cookie dough and bittersweet chocolate in the brownie layer give the dessert a deeper chocolate flavour.
- Keep the layers even: Spread the cookie dough and brownie batter evenly in the baking pan. This makes the finished sandwiches easier to assemble and cut.
- Allow the layers to cool completely: Adding ice cream to warm brownies or cookies will cause it to melt quickly. Let every baked layer cool before assembling.
- Freeze between layers: A short freezing period helps the ice cream firm up before you add the next layer. This also prevents the different layers from sliding around.
- Experiment with toppings: Add chopped nuts, mini chocolate chips, crushed cookies or a little caramel sauce for extra flavour and texture.
Also Read: Oreo Ice Cream Recipe
Brookie Ice Cream Sandwiches Ingredients
This recipe makes approximately 12 to 15 generous servings. You will prepare two chocolate chip cookie layers, one brownie layer and two layers of ice cream. A 9 x 13-inch rectangular baking pan works well for baking and assembling the dessert.
For the Chocolate Chip Cookie Layers
- 3 cups (340 g) unsalted butter, softened
- 3 1/2 cups (440 g) all-purpose flour
- 2 1/2 cups (500 g) packed brown sugar
- 4 tablespoons milk
- 2 tablespoons vanilla extract
- 2 large eggs
- 2 teaspoons salt
- 1 1/2 teaspoons baking soda
- 3 cups (510 g) semisweet chocolate chips
For the Fudgy Brownie Layer
- 8 ounces (225 g) bittersweet chocolate, chopped
- 1/2 cup (115 g) unsalted butter
- 3/4 cup (95 g) all-purpose flour
- 1 cup (200 g) brown sugar
- 1/2 teaspoon baking powder
- 1/2 teaspoon salt
- 2 large eggs
- 2 teaspoons vanilla extract
- 1/4 cup (25 g) unsweetened cocoa powder
For the Ice Cream Layers
- 2 pints (approximately 950 ml) vanilla ice cream
- 2 pints (approximately 950 ml) mint chocolate chip ice cream
Optional toppings: Mini chocolate chips, crushed chocolate cookies, chopped walnuts, chocolate sauce or caramel sauce.
Also Read: Apple Cider Ice Cream Floats
How to Make Brookie Ice Cream Sandwiches
Step 1: Prepare the Cookie Dough
Preheat your oven to 375°F (190°C). In a large mixing bowl, beat the softened butter and brown sugar until the mixture becomes light and fluffy. Add the eggs one at a time, mixing well after each addition. Stir in the milk and vanilla extract until everything is combined.
In another bowl, whisk together the flour, salt and baking soda. Gradually add the dry ingredients to the butter mixture and mix until a soft dough forms. Fold in the semisweet chocolate chips using a spatula so they are evenly distributed throughout the dough.
Step 2: Bake the Cookie Layers
Divide the cookie dough into two equal portions. Lightly grease a 9 x 13-inch metal baking pan or line it with parchment paper. Press one portion of dough into the pan, spreading it evenly from corner to corner. Bake for approximately 18 to 20 minutes, or until the edges are lightly golden and the centre is set.
Allow the cookie layer to cool for about 15 to 20 minutes before carefully removing it from the pan. Repeat the process with the remaining cookie dough to make the second layer. Let both cookie layers cool completely before assembling the dessert.
Step 3: Prepare the Brownie Batter
Place the chopped bittersweet chocolate and butter in a microwave-safe bowl. Heat in short 20-second intervals, stirring between each interval, until the chocolate and butter melt into a smooth mixture. You can also melt them together using a heatproof bowl over a saucepan of gently simmering water.
Add the brown sugar and mix well. Allow the mixture to cool slightly, then whisk in the eggs and vanilla extract until smooth. In a separate bowl, combine the flour, cocoa powder, baking powder and salt. Gradually fold the dry ingredients into the chocolate mixture until no dry flour remains. Avoid overmixing, as this can make the brownie layer dense.
Step 4: Bake the Brownie Layer
Grease and line the same 9 x 13-inch baking pan with parchment paper. Pour the brownie batter into the pan and spread it evenly using a spatula. Bake at 375°F (190°C) for approximately 18 to 20 minutes, or until a toothpick inserted near the centre comes out with a few moist crumbs.
Remove the brownie from the oven and allow it to cool for 15 to 20 minutes before carefully lifting it out of the pan. Let it cool completely. The brownie should be firm enough to handle but still have a soft, fudgy texture.
Step 5: Assemble the First Cookie and Ice Cream Layers
Clean and dry the baking pan before starting the assembly. Place one chocolate chip cookie layer at the bottom of the pan. Take the vanilla ice cream out of the freezer and let it soften slightly until it becomes easy to spread. Do not allow it to melt completely.
Spread the vanilla ice cream evenly over the cookie layer, making sure it reaches the edges. Place the cooled brownie layer on top and gently press it down so that it sits evenly. Cover the pan and place it in the freezer for about 10 to 15 minutes to help the layers firm up.
Step 6: Add the Second Ice Cream and Cookie Layers
Remove the pan from the freezer and spread the softened mint chocolate chip ice cream evenly over the brownie layer. Work quickly so the ice cream does not become too soft. Carefully place the second chocolate chip cookie layer on top and press gently to create an even finish.
Cover the entire pan with plastic wrap or aluminium foil and return it to the freezer. Freeze for at least 4 to 6 hours, preferably overnight, until the ice cream is completely firm and the layers hold together.
Step 7: Cut and Serve
When you are ready to serve, remove the pan from the freezer and let it sit at room temperature for approximately 5 to 10 minutes. Run a sharp knife under warm water, wipe it dry and cut the frozen dessert into squares or rectangular sandwiches.
For an extra-special finish, drizzle a little chocolate sauce over the top or sprinkle some mini chocolate chips around the edges. Serve immediately while the ice cream is still firm and creamy.
Tips for Making the Best Brookie Ice Cream Sandwiches
- Use a metal baking pan: A metal pan helps the cookie and brownie layers bake more evenly and makes it easier to get neat, defined edges.
- Do not overbake: Cookie layers should remain slightly soft, while the brownie should have a fudgy centre. Overbaking can make the finished dessert difficult to bite into after freezing.
- Soften ice cream carefully: Let the ice cream sit out briefly before spreading. It should be soft enough to work with but should not become runny.
- Use parchment paper: Lining the baking pan makes removing the cookie and brownie layers much easier.
- Freeze before slicing: Give the assembled dessert enough time to become completely firm. This is the secret to getting clean, attractive pieces.
- Warm the knife: Dip your knife in warm water and wipe it dry between cuts for smooth edges.
Different Ice Cream Flavours to Try
You do not have to stick to vanilla and mint chocolate chip. These sandwiches are easy to customise with different ice cream flavours. Try one of these combinations the next time you make them:
| Ice Cream Flavour | Why It Works |
|---|---|
| Cookies and Cream | Adds crunchy cookie pieces and extra chocolate flavour. |
| Chocolate | Creates an intensely chocolatey dessert with the brownie and cookie layers. |
| Strawberry | Brings a fruity and slightly tangy contrast to the rich chocolate. |
| Salted Caramel | Adds a sweet, buttery flavour with a little saltiness. |
| Peanut Butter | Pairs beautifully with chocolate and gives the dessert a nutty flavour. |
| Vanilla Bean | Keeps things classic and balances the richness of the brownie. |
Also Read: Ice Cream Sandwich Dessert
How to Store Brookie Ice Cream Sandwiches
These ice cream sandwiches are best stored in the freezer. Once the dessert is fully frozen, cut it into individual portions and wrap each piece tightly in plastic wrap. Place the wrapped pieces in an airtight freezer-safe container or bag to prevent freezer burn and keep them fresh.
They can generally be stored in the freezer for up to 2 weeks for the best taste and texture. You can enjoy them straight from the freezer after letting them sit at room temperature for a few minutes. If you are preparing them for a party, keep the dessert whole in the baking pan and slice it just before serving. This helps the layers stay together and reduces melting.
Frequently Asked Questions
Can I make Brookie Ice Cream Sandwiches ahead of time?
Yes. This dessert is a great make-ahead treat. You can bake the cookie and brownie layers a day in advance, allow them to cool completely and store them in airtight containers. Assemble the dessert with ice cream when you are ready and freeze until firm.
What is the difference between a brookie and a regular brownie?
A regular brownie is made primarily with chocolate or cocoa powder, while a brookie combines brownie and chocolate chip cookie flavours. It can be prepared as a layered dessert or as a marbled mixture of both batters.
Can I use store-bought cookie dough and brownies?
Absolutely. Store-bought chocolate chip cookie dough and ready-made brownies can save preparation time. Bake the cookie dough into two thin layers according to its package directions and use a brownie layer that fits your baking pan.
How long should I freeze the sandwiches?
Freeze the assembled dessert for at least 4 to 6 hours so the ice cream becomes firm enough to slice. Overnight freezing is even better if you want clean, well-defined layers.
Why are my ice cream sandwiches difficult to cut?
The dessert may be too hard straight from the freezer. Leave it at room temperature for about 5 to 10 minutes before cutting. A sharp knife warmed under hot water will also make slicing easier.
Can I use only one ice cream flavour?
Yes. You can use a single flavour throughout the ice cream layers. Vanilla, chocolate and cookies and cream are particularly good choices for this recipe.
Brookie Ice Cream Sandwiches Nutritional Information
These sandwiches are an indulgent dessert, combining butter-rich cookies, chocolate brownies and ice cream. The nutritional values below are estimates for one serving, assuming the recipe is divided into 15 portions. Actual values will vary depending on the brands of chocolate, butter and ice cream you use.
| Nutrient | Approximate Amount per Serving |
|---|---|
| Calories | 950 kcal |
| Total Fat | 55 g |
| Saturated Fat | 33 g |
| Cholesterol | 125 mg |
| Sodium | 500 mg |
| Total Carbohydrates | 110 g |
| Dietary Fibre | 4 g |
| Total Sugars | 80 g |
| Protein | 11 g |
Disclaimer: Nutritional information is an estimate and should be used as a general guide rather than an exact dietary calculation.