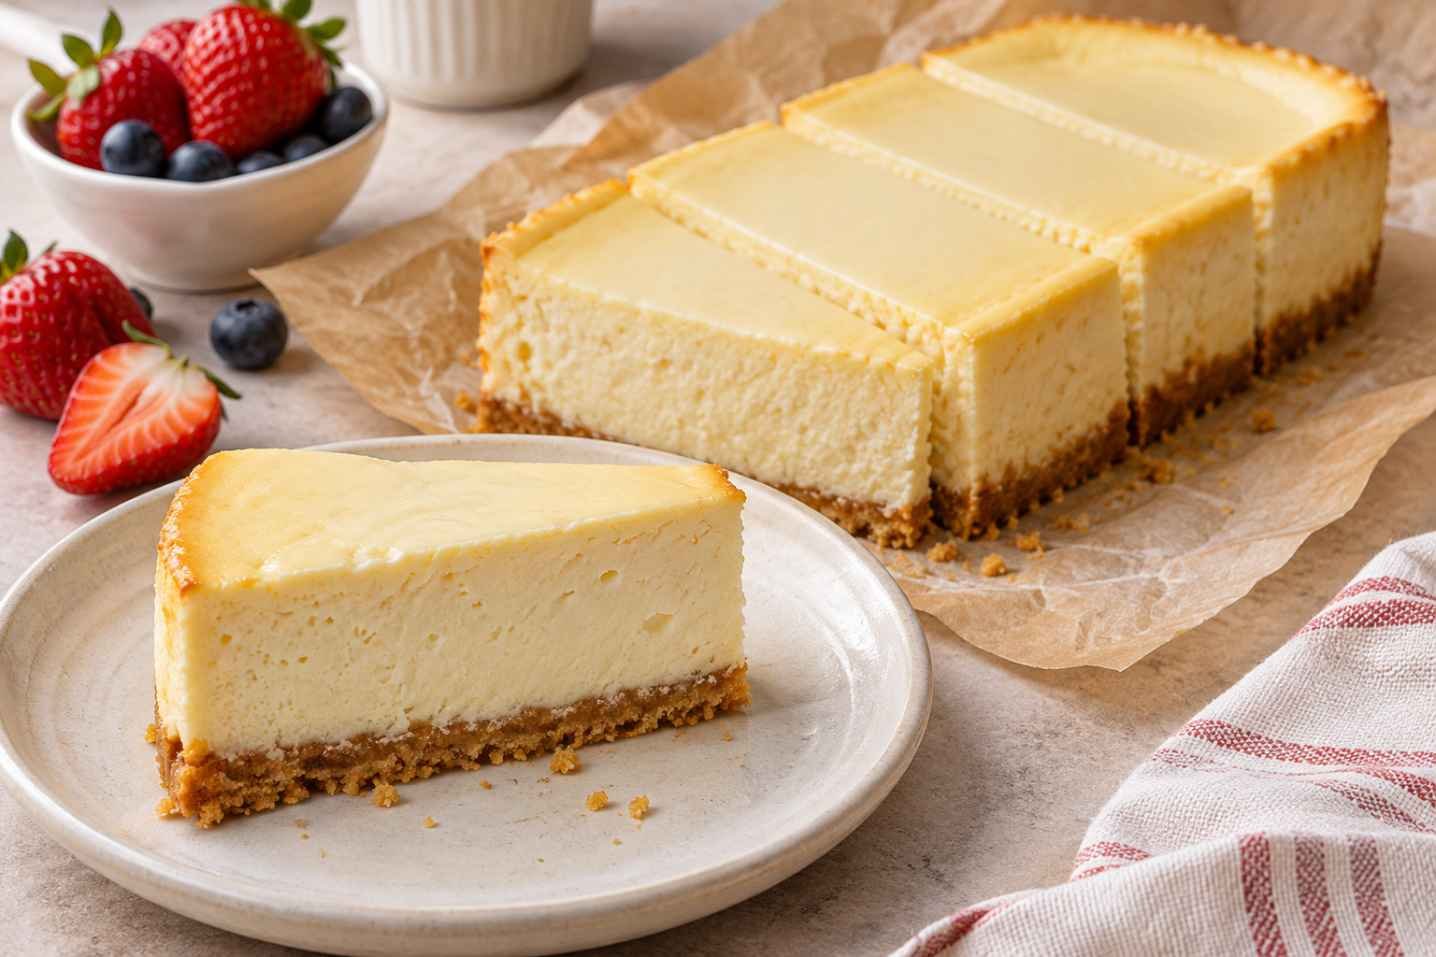
Sometimes you want a proper homemade cheesecake without committing to a giant dessert that sits in the refrigerator for the rest of the week. This Creamy Small Batch Cheesecake is made for exactly those occasions. It has a buttery biscuit crust, a thick cream cheese filling, and that smooth, slightly tangy flavor that makes a good cheesecake so difficult to resist.
The best part is that you don’t need a springform pan or a complicated water bath. A regular loaf pan works beautifully, giving you a small cheesecake that can be sliced into four to six portions. It’s a lovely dessert for two, a quiet weekend dinner, or a small family celebration.
Although the ingredient list is short, the finished cheesecake tastes wonderfully rich. The filling is creamy without being overly sweet, while a little lemon juice balances the richness of the cream cheese. Serve it plain, add a spoonful of berry sauce, or finish each slice with fresh strawberries.
Creamy Small Batch Cheesecake Recipe Overview
| Recipe Details | Information |
|---|---|
| Preparation Time | 20 minutes |
| Crust Baking Time | 10 minutes |
| Cheesecake Baking Time | 35–45 minutes |
| Cooling Time | Approximately 1 hour |
| Chilling Time | At least 4 hours |
| Total Time | Approximately 6 hours |
| Servings | 5 slices |
| Difficulty | Easy to Moderate |
| Pan Size | 8.5 x 4.5-inch loaf pan |
| Cooking Method | Oven Baking |
Ingredients for Creamy Small Batch Cheesecake
You only need a few familiar baking ingredients for this recipe. Full-fat cream cheese gives the filling its rich texture, while sour cream adds a little softness and tanginess. For the best results, measure the ingredients before you begin and allow the refrigerated filling ingredients to reach room temperature.
For the Biscuit Crust
- 3/4 cup (90 g) graham cracker crumbs: Finely crushed graham crackers make a crisp, buttery base. Digestive biscuits are a good alternative.
- 3 tablespoons (42 g) unsalted butter, melted: Holds the crumbs together and gives the crust its rich flavor.
- 1 tablespoon (12 g) granulated sugar: Adds a little sweetness and helps the crust hold together.
- A small pinch of salt: Balances the sweetness of the biscuits.
For the Cheesecake Filling
- 12 oz (340 g) full-fat block cream cheese, softened: The main ingredient responsible for the cheesecake’s thick, creamy consistency.
- 1/3 cup plus 1 tablespoon (80 g) granulated sugar: Sweetens the filling without overpowering the cream cheese flavor.
- 1 large egg, at room temperature: Helps the cheesecake set during baking.
- 1/4 cup (60 g) full-fat sour cream: Adds moisture and a pleasant tanginess.
- 1 teaspoon vanilla extract: Gives the filling a warm, rounded flavor.
- 1 teaspoon fresh lemon juice: Brightens the flavor without making the cheesecake noticeably lemony.
- 1 teaspoon cornstarch: Helps stabilize the filling and gives the cheesecake a little extra protection against cracking.
Optional Toppings
- Fresh strawberries, raspberries, or blueberries
- Homemade strawberry or cherry sauce
- Lemon curd
- Salted caramel sauce
- Lightly whipped cream
- Shaved dark chocolate
Also Read: Mini Cheesecakes
How to Make Creamy Small Batch Cheesecake
This cheesecake comes together in a few straightforward stages. The most important things are to start with softened cream cheese, avoid overmixing once the egg has been added, and allow enough time for chilling.
Step 1: Prepare the Loaf Pan
Preheat your oven to 325°F (163°C). Line an 8.5 x 4.5-inch loaf pan with parchment paper, leaving some paper hanging over the two longer sides. These overhanging edges will act as handles when it’s time to lift out the chilled cheesecake. Lightly grease the pan before adding the parchment if necessary to help keep it in place.
Place the oven rack in the lower-middle position so the cheesecake can bake evenly without the top browning too quickly.
Step 2: Make the Graham Cracker Crust
Combine the graham cracker crumbs, melted butter, sugar, and salt in a medium bowl. Stir until the mixture resembles damp sand. When you squeeze a little between your fingers, it should hold together rather than immediately falling apart.
Transfer the crumb mixture to the prepared loaf pan. Press it firmly and evenly across the bottom using the flat base of a measuring cup or a small glass. Pay particular attention to the corners, where loose crumbs tend to collect.
Bake the crust for about 10 minutes, until it looks slightly darker and smells toasted. Remove it from the oven and allow it to cool briefly while preparing the filling. Keep the oven temperature at 325°F (163°C).
Step 3: Beat the Cream Cheese
Place the softened cream cheese in a mixing bowl. Using a handheld mixer on medium-low speed, beat it until smooth and free of lumps, about 1–2 minutes. Scrape the bottom and sides of the bowl with a spatula.
Add the granulated sugar and cornstarch. Mix until the sugar is incorporated and the filling looks creamy. Avoid whipping the mixture excessively. Too much incorporated air can cause the cheesecake to rise dramatically in the oven and sink as it cools.
Step 4: Add the Remaining Filling Ingredients
Add the sour cream, vanilla extract, and lemon juice. Mix on low speed until combined. Next, add the egg and mix only until it disappears into the batter.
Use a spatula to scrape the bowl and gently fold the mixture a few times, making sure there are no pockets of unmixed cream cheese. The finished batter should be thick, smooth, and pourable, with very few visible air bubbles.
Step 5: Fill the Pan
Pour the cheesecake filling over the partially cooled biscuit crust. Spread it into an even layer using a spatula. Gently tap the loaf pan against the counter once or twice to release any large air pockets.
The filling should sit comfortably below the rim of the pan. If your loaf pan is unusually shallow, do not fill it to the very top.
Step 6: Bake the Cheesecake
Place the pan in the preheated oven and bake for approximately 35–45 minutes. Begin checking around the 35-minute mark, as the exact baking time depends on the depth of the filling and your oven.
The cheesecake is ready when the outer edges look set but the center still has a gentle wobble when the pan is lightly shaken. The middle should move as one soft piece rather than ripple like liquid.
A little movement in the center is normal. The cheesecake continues to firm up as it cools, so avoid baking it until the entire surface becomes completely rigid. Overbaking can make the filling dry or grainy.
Step 7: Cool Gradually
Turn off the oven and leave the cheesecake inside with the door slightly open for about 15 minutes. This helps reduce the sudden temperature change that can cause cracks. Remove the pan and place it on a wire rack.
Let the cheesecake cool until it reaches room temperature, approximately another 45–60 minutes. Do not leave it unrefrigerated for more than two hours in total.
Step 8: Refrigerate Until Firm
Once the cheesecake has cooled, cover the pan loosely and refrigerate it for at least four hours. Overnight chilling is even better if you want particularly neat slices.
During this time, the filling becomes firmer, the flavors settle, and the crust develops a more cohesive texture. Cutting into the cheesecake too early can leave you with a soft center and messy slices.
Step 9: Slice and Serve
Use the parchment paper overhang to lift the chilled cheesecake out of the loaf pan. Place it on a cutting board and carefully peel away the parchment from the sides.
Slice into five portions using a sharp knife. For cleaner edges, dip the knife into hot water, wipe it dry, and clean the blade between cuts. Serve cold with your favorite topping, or leave it plain to enjoy the delicate vanilla and cream cheese flavors.
Also Read: Classic New York Cheesecake Recipe
What You Can Do Better
A small cheesecake may look simple, but a few details make a noticeable difference to the final texture. These are the things worth paying attention to, particularly if you’re making baked cheesecake for the first time.
Use Block Cream Cheese Instead of Spreadable Cream Cheese
Full-fat block cream cheese gives the filling the structure it needs to set properly. Spreadable cream cheese sold in tubs can contain more moisture and additional stabilizers, which may change the texture. If possible, choose a firm cream cheese intended for baking.
Bring the Ingredients to Room Temperature
Cold cream cheese is one of the main reasons cheesecake batter turns lumpy. Leave the cream cheese, egg, and sour cream out briefly before mixing, keeping food safety in mind. Softened cream cheese blends smoothly with the other ingredients and requires less beating.
Don’t Overmix After Adding the Egg
It’s tempting to keep beating until the filling looks light and fluffy, but cheesecake isn’t supposed to have the texture of a sponge cake. Excess air expands during baking and can lead to a puffed surface that collapses or cracks. Mix gently once the egg goes in.
Pay Attention to the Crust
The crust should feel compact before baking. If the crumbs are too dry to hold together, add a small amount of extra melted butter. On the other hand, too much butter can produce a greasy crust that becomes hard after refrigeration. Aim for crumbs that resemble damp sand.
Watch the Center, Not Just the Clock
Ovens vary, and even loaf pans of similar dimensions can produce different baking times. Rather than relying entirely on the timer, look for set edges and a gently wobbling center. This is a more useful indication of doneness than waiting for the cheesecake to look completely firm.
Give the Cheesecake Enough Time to Chill
Four hours of refrigeration is the minimum recommended for this recipe. If you’re serving it for a dinner party or special occasion, making it the night before is a good idea. A fully chilled cheesecake holds its shape better and has a richer, more balanced flavor.
How to Tell When a Small Batch Cheesecake Is Done
One of the trickiest parts of baking cheesecake is knowing when to remove it from the oven. Unlike an ordinary cake, cheesecake should not be baked until a toothpick comes out completely dry.
Look for a surface that appears mostly set, with edges that remain steady when the pan is moved. The center should wobble gently, but it should not appear wet or slosh around.
If you have an instant-read thermometer, a center temperature of approximately 150–155°F (66–68°C) can be a useful additional guide for this style of cheesecake. Insert the probe carefully without touching the crust or pan.
Remember that the cheesecake will continue to set as it cools and chills. Leaving it in the oven too long can turn a smooth filling into a dense, dry one.
Also Read: Pancakes Recipe Using Buttermilk
Delicious Variations to Try
Strawberry Small Batch Cheesecake
Spoon a little homemade strawberry sauce over each chilled slice. You can make a quick sauce by gently simmering chopped strawberries with a small amount of sugar and lemon juice until the fruit softens. Allow the sauce to cool before serving.
Lemon Cheesecake
Add approximately one teaspoon of finely grated lemon zest to the filling for a brighter citrus flavor. Keep the lemon juice quantity the same to avoid introducing too much additional liquid.
Chocolate Cookie Crust
Replace the graham cracker crumbs with finely crushed chocolate sandwich cookies. Reduce the added butter slightly if the cookies contain a cream filling. This creates a richer base that pairs especially well with fresh berries.
Salted Caramel Cheesecake
Drizzle a spoonful of salted caramel over each slice just before serving. A few toasted pecans can add a pleasant crunch and balance the creamy filling.
Blueberry Cheesecake
Top the finished cheesecake with a simple blueberry compote made from blueberries, a little sugar, and lemon juice. Keep the compote fairly thick so it sits on the cheesecake rather than running down the sides.
Common Cheesecake Problems and How to Fix Them
| Problem | Possible Cause | What to Do |
|---|---|---|
| Cracks on the surface | Overmixing, overbaking, or rapid cooling | Mix gently, remove while the center still wobbles, and cool gradually. |
| Lumpy filling | Cream cheese was too cold | Soften the cream cheese properly and beat it smooth before adding other ingredients. |
| Soggy crust | Crust was not sufficiently baked or was too buttery | Prebake the crust and measure the melted butter carefully. |
| Cheesecake sinks in the middle | Too much air incorporated during mixing | Use low speed after adding the egg and avoid whipping the batter. |
| Center remains runny | Insufficient baking or incorrect ingredient proportions | Continue baking in short intervals until the edges set and the center has a gentle wobble. |
| Dry or grainy filling | Overbaking | Check the cheesecake early and avoid waiting for a completely firm center. |
| Crust crumbles when sliced | Crumbs were too coarse or loosely packed | Use finely crushed biscuits and press the mixture firmly into the pan. |
How to Store Small Batch Cheesecake
Refrigerating
Store leftover cheesecake in an airtight container in the refrigerator for up to four days. Keep toppings such as whipped cream or fresh fruit separate until serving whenever possible. Cheesecake contains dairy and eggs, so it should not be left at room temperature for extended periods.
Freezing
This cheesecake freezes well. Once completely chilled, cut it into individual portions and wrap each slice tightly in plastic wrap. Place the wrapped slices in a freezer-safe container or bag and freeze for up to two months for the best texture.
Thawing
Transfer frozen slices to the refrigerator and allow them to thaw overnight. Avoid thawing at room temperature for long periods, and do not microwave the cheesecake, as this can affect its smooth texture.
Making Ahead
For the easiest preparation, bake the cheesecake one day before you plan to serve it. Refrigerate overnight and add toppings just before slicing. This is especially convenient when preparing dessert for guests.
Also Read: Salted Caramel Cake with Homemade Caramel
Nutritional Information
The following values are approximate estimates for one slice when the cheesecake is divided into five equal servings. They are based on the listed ingredients and do not include optional toppings. Actual values will vary depending on the brands and products used.
| Nutrient | Approximate Amount Per Slice |
|---|---|
| Calories | 470 kcal |
| Total Fat | 35 g |
| Saturated Fat | 20 g |
| Cholesterol | 145 mg |
| Sodium | 340 mg |
| Total Carbohydrates | 35 g |
| Dietary Fiber | 0.5 g |
| Total Sugars | 24 g |
| Protein | 7 g |
Note: Nutritional information is an estimate rather than a laboratory-tested calculation. Using different biscuit brands, cream cheese varieties, or toppings will change the final values.
Also Read: Creamy Chocolate Pie Recipe
Frequently Asked Questions
Can I Make Small Batch Cheesecake Without a Springform Pan?
Yes. This recipe is designed for a regular loaf pan lined with parchment paper. The parchment overhang makes it easy to lift out the cheesecake after chilling, so there’s no need to purchase a special pan.
Do I Need a Water Bath for This Cheesecake?
No. The small size and relatively gentle baking temperature make a water bath unnecessary for this recipe. However, careful mixing and gradual cooling are still important for a smooth surface.
Can I Use a 9 x 5-Inch Loaf Pan?
Yes, a 9 x 5-inch loaf pan will also work. The filling will be slightly shallower, so begin checking for doneness a few minutes earlier than the suggested baking time.
Can I Use Greek Yogurt Instead of Sour Cream?
Plain, full-fat Greek yogurt can be used in the same quantity, although the flavor and texture may be slightly different. Choose a thick yogurt rather than a thin or watery variety.
Why Is My Cheesecake Still Soft After Baking?
Cheesecake is naturally softer when warm. If the edges are set and the center has only a gentle wobble, it will usually firm up after proper cooling and refrigeration. If the center is visibly liquid, however, it needs additional baking time.
Can I Make This Cheesecake Without Eggs?
Removing the egg would significantly change how the filling sets. An eggless cheesecake requires a different formulation, so simply leaving out the egg is not recommended for this recipe.
How Long Should Cheesecake Chill Before Serving?
Allow at least four hours in the refrigerator. For the cleanest slices and best texture, refrigerate overnight. Chilling is an essential part of the recipe rather than an optional finishing step.
Can I Double the Recipe?
Yes, but doubling the ingredients will require a larger pan and a different baking time. For predictable results, use a properly developed full-size cheesecake recipe rather than assuming the original baking time will remain the same.
Serving Suggestions
This cheesecake is rich enough to serve without any toppings, but a little contrast can make it even better. Fresh berries add brightness, while a spoonful of fruit sauce brings a pleasant tartness. For a more indulgent dessert, try caramel sauce or a little dark chocolate.
If you’re serving cheesecake after a heavy meal, cut slightly smaller portions and pair them with fresh fruit. For an afternoon treat, a plain slice goes particularly well with coffee or unsweetened tea.
Keep the cheesecake refrigerated until shortly before serving. It tastes best cold, when the filling is firm enough to hold a clean slice but still feels creamy on the tongue.