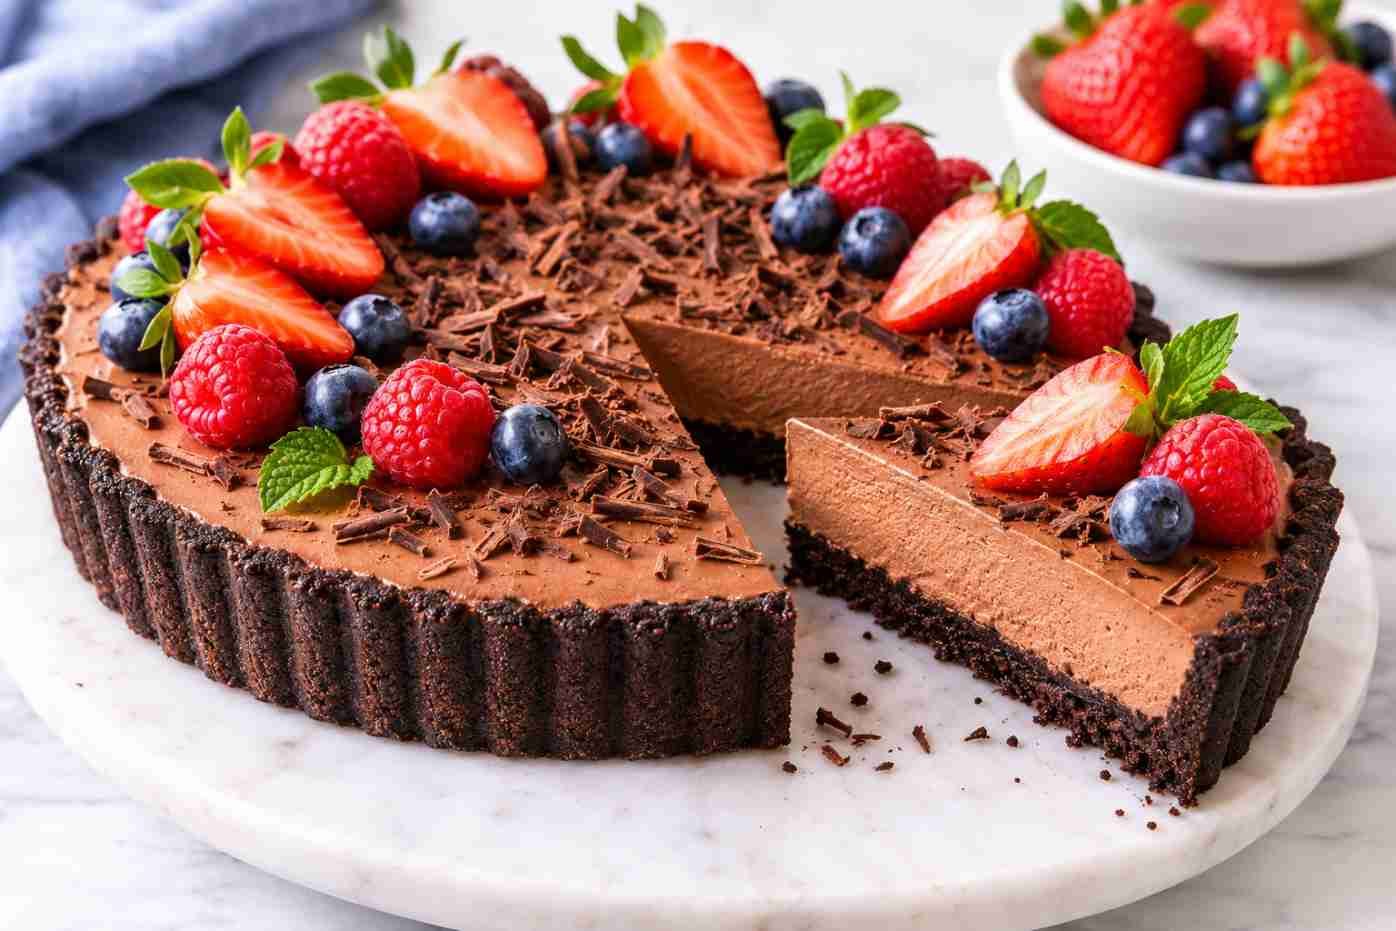
This Milk Chocolate Mousse Tart has a crunchy chocolate cookie crust filled with smooth milk chocolate mousse. The filling is light and fluffy compared to a traditional chocolate ganache, while the buttery crust gives every slice a satisfying crunch.
The best part is that you don’t need complicated baking skills or fancy ingredients to make this dessert. A few basic ingredients, a tart pan, and some chilling time are enough to put everything together. Fresh berries, chocolate shavings, or a little whipped cream make a lovely finishing touch.
What Makes This Milk Chocolate Mousse Tart Special?
This tart brings together two different chocolate textures in one dessert. The base is made with crushed chocolate sandwich cookies and melted butter, creating a firm crust with a slightly crunchy bite. The mousse filling is made with melted milk chocolate and whipped cream, giving it a smooth, airy texture.
Unlike a traditional baked tart filling, this mousse doesn’t need to go back into the oven. Once the crust has been baked and cooled, you simply add the chocolate mixture and let the refrigerator do the rest. It is a great dessert for birthdays, dinner parties, holidays, or whenever you want something homemade without spending hours in the kitchen.
Milk Chocolate Mousse Tart Recipe
| Recipe Details | Information |
|---|---|
| Preparation Time | 25 minutes |
| Cooking Time | 8–10 minutes |
| Chilling Time | 2–3 hours |
| Total Time | Approximately 3 hours 35 minutes |
| Servings | 10 slices |
| Course | Dessert |
| Cuisine | American-inspired |
| Difficulty | Easy |
Ingredients for Milk Chocolate Mousse Tart
You’ll need two sets of ingredients: one for the chocolate cookie crust and another for the mousse filling. Fresh berries are optional, but they add a nice fruity contrast to the sweet chocolate.
For the Chocolate Cookie Crust
- 280 g chocolate sandwich cookies (approximately 26 cookies)
- 85 g unsalted butter, melted
- A little nonstick cooking spray for preparing the tart pan
For the Milk Chocolate Mousse Filling
- 340 g milk chocolate chips or finely chopped milk chocolate
- 240 ml heavy whipping cream, chilled
- 2 tablespoons granulated sugar
- 1 teaspoon pure vanilla extract
For Topping
- 1½ to 2 cups fresh mixed berries
- Chocolate shavings or grated chocolate (optional)
- Extra whipped cream (optional)
Also Read: Salted Caramel Ice Cream Mud Pie
How to Make Milk Chocolate Mousse Tart
Follow these steps to prepare the crust, make the mousse filling, and assemble the tart. Give the chocolate enough time to cool before mixing it with the whipped cream. This small detail helps you get a smooth and fluffy filling.
Step 1: Prepare the Tart Pan
Preheat your oven to 175°C (350°F). Take a 9-inch tart pan with a removable bottom and lightly grease it with nonstick cooking spray. You can also place a round piece of parchment paper at the bottom to make removing the tart easier. If you don’t have a tart pan, a springform pan will work as well.
Step 2: Make the Chocolate Cookie Crust
Place the chocolate sandwich cookies in a food processor and crush them until they turn into fine crumbs. If you don’t have a food processor, put the cookies in a sealed food bag and crush them with a rolling pin. Transfer the crumbs to a mixing bowl and pour in the melted butter. Stir until the mixture resembles damp sand and holds together when pressed.
Step 3: Shape and Bake the Crust
Transfer the cookie mixture into the prepared tart pan. Press it firmly across the bottom and up the sides using the back of a spoon or the bottom of a measuring cup. Make sure the crust has an even thickness so it doesn’t break easily when sliced. Bake for approximately 8–10 minutes. Remove the pan from the oven and allow the crust to cool completely before adding the mousse.
Step 4: Melt the Milk Chocolate
Place the milk chocolate and vanilla extract in a heatproof bowl. Set the bowl over a saucepan containing gently simmering water, making sure the bottom of the bowl doesn’t touch the water. Stir occasionally until the chocolate melts and becomes smooth. You can also melt the chocolate in a microwave using short 15–20 second intervals, stirring between each round. Remove from the heat and let the chocolate cool until it is no longer warm but still soft and pourable.
Step 5: Whip the Cream
Pour the chilled heavy whipping cream into a large, clean mixing bowl. Add the granulated sugar and beat using an electric mixer until stiff peaks form. This means the cream should hold its shape when you lift the beaters. Be careful not to overwhip it, as the cream can become grainy and start turning into butter. Keep the whipped cream chilled while preparing the next step.
Step 6: Prepare the Chocolate Mousse
Add a small portion of the whipped cream to the cooled melted chocolate and gently stir to loosen the mixture. Next, gradually fold the remaining whipped cream into the chocolate using a spatula. Use slow, gentle movements rather than vigorous stirring. This helps keep the air inside the whipped cream, which gives the mousse its soft and fluffy texture. Continue folding until there are no large streaks of cream remaining.
Step 7: Fill the Tart Shell
Pour the milk chocolate mousse into the completely cooled cookie crust. Spread it evenly with a spatula and smooth the top. You can make small decorative swirls on the surface if you want a homemade finish. Cover the tart carefully without touching the mousse and place it in the refrigerator for at least 2–3 hours, or until the filling is firm enough to slice.
Step 8: Add the Toppings and Serve
Once the mousse has set, carefully remove the tart from the pan. Arrange fresh strawberries, raspberries, blueberries, or blackberries over the top. Add a little grated chocolate or a few small swirls of whipped cream if desired. Slice with a sharp knife and serve chilled.
What You Can Do Better
A few small adjustments can make this chocolate tart even better. Here are some useful tips to help you get the best results.
- Choose good-quality chocolate: Milk chocolate is the main flavor of the mousse, so use chocolate that you enjoy eating on its own. Good-quality chocolate generally melts more smoothly and gives the filling a better flavor.
- Cool the melted chocolate: Never mix hot chocolate directly into whipped cream. The heat can melt the cream and make the mousse lose its fluffy texture. Let the chocolate cool before folding it in.
- Keep the cream cold: Cold heavy cream whips more easily and holds its shape better. Chilling your mixing bowl and beaters for a few minutes can also help, especially in a warm kitchen.
- Press the crust firmly: A loose cookie crust may crumble when you remove the first slice. Press the crumbs firmly into the bottom and sides of the pan to create an even base.
- Give it enough chilling time: The mousse needs time to become firm. If you cut the tart too early, the filling may not hold its shape. Overnight chilling is a good option when preparing it ahead.
- Balance the sweetness: Milk chocolate and sandwich cookies are already sweet. If you prefer a less sweet dessert, reduce the added sugar slightly or serve the tart with fresh raspberries.
Also Read: Air Fried Cinnamon Glazed Donut Holes
Easy Variations to Try
Dark Chocolate Mousse Tart
If milk chocolate tastes too sweet for you, replace it with semi-sweet or dark chocolate. Dark chocolate gives the mousse a deeper cocoa flavor and pairs especially well with the chocolate cookie crust. You can keep the same basic method and adjust the sweetness to your taste.
Chocolate and Strawberry Tart
Strawberries and chocolate make a classic combination. Arrange fresh strawberry halves over the mousse before serving. You can also add a few thin strawberry slices around the edges for a simple but attractive finish.
Chocolate Orange Mousse Tart
For a slightly different flavor, add a little finely grated orange zest to the melted chocolate after it has cooled. Orange adds a fresh citrus note that balances the richness of the milk chocolate. A few curls of orange peel also make a nice decoration.
Nutty Chocolate Tart
If you enjoy a little crunch, sprinkle chopped toasted hazelnuts, almonds, or pecans over the finished tart. The nuts add texture and their roasted flavor works beautifully with the creamy chocolate filling.
What to Serve with Milk Chocolate Mousse Tart
Since this tart is quite rich, you don’t need a complicated side dish. Fresh berries are one of the best choices because their natural tartness balances the sweetness of the mousse. You can also serve each slice with a small spoonful of unsweetened whipped cream, fresh strawberries, or a few toasted nuts.
For drinks, coffee, espresso, or unsweetened tea work particularly well. If you’re serving the tart after dinner, keep the portions small. A thin slice is often enough to satisfy a chocolate craving.
Also Read: Hot Honey Pepperoni Cheese Bites
How to Store Milk Chocolate Mousse Tart
Store leftover tart in an airtight container or cover it carefully with plastic wrap and keep it in the refrigerator. It is best enjoyed within 3 days for the freshest flavor and texture. If you are adding fresh berries, try to decorate the tart shortly before serving because berries can release moisture as they sit.
You can prepare the crust and mousse a day ahead, then keep the assembled tart refrigerated overnight. Add the toppings just before serving. Freezing is possible, but the texture of the whipped cream mousse may change slightly after thawing. If you freeze it, wrap it well and thaw it in the refrigerator before serving.
Estimated Nutritional Information
The following nutrition information is an estimate based on the ingredients listed above and a total of 10 servings. Actual values can change depending on the brand of chocolate sandwich cookies, milk chocolate, butter, and whipping cream you use.
| Nutrient | Estimated Amount Per Serving |
|---|---|
| Calories | Approximately 450 kcal |
| Total Fat | 31 g |
| Saturated Fat | 18 g |
| Carbohydrates | 39 g |
| Sugar | 28 g |
| Protein | 5 g |
| Fiber | 2 g |
| Sodium | Approximately 220 mg |
Nutrition information is approximate and should be treated as a general guide, not a laboratory-tested nutritional analysis.
Also Read: Russian Buttercream Frosting
Frequently Asked Questions
Can I make Milk Chocolate Mousse Tart a day ahead?
Yes. This tart is a great make-ahead dessert. Prepare it the day before and leave it covered in the refrigerator overnight. Add fresh berries and other toppings just before serving.
Can I make this tart without a food processor?
Absolutely. Place the cookies in a sealed food bag and crush them with a rolling pin until they become fine crumbs. Mix them with melted butter in a bowl and use the mixture to prepare the crust.
Why is my chocolate mousse not setting?
The mousse may not set properly if the cream wasn’t whipped enough, the chocolate was too warm when mixed, or the tart hasn’t chilled long enough. Make sure the cream reaches stiff peaks and refrigerate the tart until the filling is firm.
Can I use a springform pan instead of a tart pan?
Yes. A springform pan is a useful alternative if you don’t have a tart pan with a removable bottom. Press the cookie mixture evenly across the base and slightly up the sides before baking.
Can I use dark chocolate instead of milk chocolate?
Yes. You can replace the milk chocolate with semi-sweet or dark chocolate. The flavor will be less sweet and more intense. Taste the mixture before adding extra sugar, as dark chocolate doesn’t always need additional sweetness.
How long does Milk Chocolate Mousse Tart need to chill?
Allow at least 2–3 hours for the mousse to set properly. If you have enough time, refrigerating it overnight will give you a firmer tart that is easier to slice.
Can I freeze Milk Chocolate Mousse Tart?
You can freeze the tart in an airtight, freezer-safe container. However, the mousse texture may change slightly after thawing. For the best result, thaw it slowly in the refrigerator and add fresh toppings before serving.